Preparing spring boot application for production
Spring boot is an awesome library that allows swift spring web application development and deployment. We heavily use start.spring.io for generating the skeleton project with a basic setup and then use the required dependencies. The primary focus of Spring boot is a hassle-free dependency management and autoconfiguration. But there are different other aspects that can be used in production for better functionality and control. We will see those configurations below.
Profiles
Profiles are an important feature of Spring boot. They are also supported in the vanilla spring using some configuration tweaks and prefixes. But Spring boot provides very good out of the box support for the same. We can configure profiles in both yaml based configuration as well as properties based configuration. Having different profiles in the same project allows you to run the same build of the application in different environments with varying configurations.
For eg: We will have different database configuration for dev, staging, production etc. We can configure this per profile and run the same build with a specific profile as active.
Profile based on yml file.
We are mostly using yml based files for our configurations due to its comprehensive structure format. For a yaml file the profiles are separated by 3 dashes ( — )
Following is a sample yml file with 3 profiles:
spring:
  profiles:
    active: dev

---
spring:
  profiles: dev
  application:
    name: boot-profile-sample
  data:
    elasticsearch:
      cluster-name: elasticsearch
      cluster-nodes: 192.168.56.21:9300
      repositories:
        enabled: true
  rabbitmq:
    host: 192.168.56.20
    username: rabbitmq
    password: rabbitmq

server:
  port: 9092


---
spring:
  profiles: staging
  application:
    name: boot-profile-sample
  data:
    elasticsearch:
      cluster-name: elasticsearch
      cluster-nodes: 172.30.41.106:9300
      repositories:
        enabled: true
  rabbitmq:
    host: localhost
    username: rabbitmq
    password: secret

server:
  port: 9093


---
spring:
  profiles: prod
  application:
    name: sj-analyze
  data:
    elasticsearch:
      cluster-name: elasticsearch
      cluster-nodes: 172.30.41.108:9300
      repositories:
        enabled: true
  rabbitmq:
    host: 10.140.0.120
    username: rabbitmq
    password: rabbitmq

server:
  port: 9093
In the above file, there are 3 profiles configured namely dev, staging and prod. The default profile set is dev using the key spring.profiles.active.
Profile based on application.properties
The properties file contains properties configured using key-value pairs. Profiles in properties files are specified using filename and suffix.
For eg:
- dev profile properties will be application-dev.properties and will contain the properties for the dev profile.
- staging profile would be specified under application-staging.properties.
- prod profile would be specified under application-prod.properties.
Using a profile while running boot application
We can activate spring boot profile using different methods
- Using the spring.profiles.active field in the yaml file
- Specify the active profile as argument to the startup configuration ( –spring.profiles.active=”staging” ) in the start up script
Having this ability to switch or activate profile is very handy option when we are using CI / CD pipelines and need to test and promote the build to production. Here there is no need to use a different build just for configuration changes.
Logback Configuration for Sprint boot
Logging is a very important aspect in production. Logs would be the source of truth when we want to check the status of a functionality or when we want to investigate a peculiar behaviour or error.
Logging can be enabled using multiple methods in a spring boot application. One of the most common methods is using the logback configuration file in the resources path ( classpath ).
For configuring a logback file, we need to create a file with name logback-spring.xml in the resources folder ( or in the classpath ). Please note that the name of the file is important and need to be logback-spring.xml for spring boot to automatically pick up.
Following is an example of logback configuration with multiple profiles and logging levels.
<?xml version="1.0" encoding="UTF-8"?>
<configuration>
    <!-- Get the property for app name from the properties file -->
    <springProperty scope="context" name="appName" source="spring.application.name"/>

    <!-- Configuration when the profile is staging / prod -->
    <springProfile name="staging,prod">
        <appender name="FILE" class="ch.qos.logback.core.rolling.RollingFileAppender">
            <file>logs/${appName}.log</file>
            <rollingPolicy class="ch.qos.logback.core.rolling.TimeBasedRollingPolicy">
                <!-- daily rollover -->
                <fileNamePattern>logs/%d{yyyy-MM-dd,aux}/${appName}.%d{yyyy-MM-dd}.%i.log</fileNamePattern>
                <!-- keep 30 days' worth of history -->
                <maxHistory>30</maxHistory>
                <timeBasedFileNamingAndTriggeringPolicy
                        class="ch.qos.logback.core.rolling.SizeAndTimeBasedFNATP">
                    <!-- or whenever the file size reaches 80MB -->
                    <maxFileSize>80MB</maxFileSize>
                </timeBasedFileNamingAndTriggeringPolicy>
            </rollingPolicy>
            <encoder>
                <pattern>%d %5p | %t | %-55logger{55} | %m %n</pattern>
            </encoder>
        </appender>

        <logger name="${appName}-logger">
            <level value="INFO"/>
        </logger>

        <root>
            <level value="INFO"/>
            <appender-ref ref="FILE"/>
        </root>
    </springProfile>

    <!-- Configuration when the profile is dev -->
    <springProfile name="dev">
        <appender name="CONSOLE" class="ch.qos.logback.core.ConsoleAppender">
            <encoder>
                <pattern>%d %5p | %t | %-55logger{55} | %m %n</pattern>
            </encoder>
        </appender>


        <logger name="${appName}-logger">
            <level value="INFO"/>
        </logger>

        <root>
            <level value="INFO"/>
            <appender-ref ref="CONSOLE"/>
        </root>
    </springProfile>
</configuration>
We can configure different logging behavior for each active profile using the SpringProfile section. As you can see in the above xml, we have staging and prod configured for file-based logging and the dev profile configured with info level to console. Also for the prod and staging, we have specified a log rotation and retention policy. The log files will be created under the name of the application taken from spring.application.name property for current profile.
Script for running a spring boot application ( Jar file )
When you build a spring boot application, by default it would be in a jar packaging. Though there is an option to use war packaging, the preferred method is jar due to its compatibility. Since the jar file already contains the embedded tomcat, you can start a spring boot application like any other jar using java -jar <app-name.jar>
We suggest you to create custom scripts per environment of the application in case you are running the spring boot as a stand alone service ( not using docker or any other container services ) . A common script for the same in a linux setup would be as below:
nohup java -Xms300m -Xmx1024m -jar <app-name.jar> --spring.profiles.active=staging > app-name-console.log 2>&1 & The above script has following components:
- nohup : This is a linux functionlity that makes sure that the process is not exited when the user logs out of the system or SSH shell. If we don’t use this option, there is a chance that the process might end when the shell session is closed for the user. This is a very serious concern when running a java process in production.
- Memory limits : It is advisable to set the minimum and maximum memory for the java process depending on the load and nature of the work handled by the process.
- The name of the jar file to be run
- The profile to be active while running. As specified before, its better to specify profile in the script so that you can just run the same build in multiple environments and the script would take care of the profile to be loaded.
- Redirection of console logs to app-name-console.log
- Error logs are also redirected to app-name-console.log ( 2 is error stream, 1 is normal stream. 2 > &1 means redirect error stream to the normal stream )
- Finally the ‘&’ make sure to run the application in the background.
Overriding properties / configurations
Spring boot has got a well defined set of priorities for the location from which the configurations should be loaded in case multiple sources are available. Following would be the priority with highest priority being the first.
- Load from the start up script ( command line ) .
- Load from the yml / properties file in the same path as the jar file.
- Load from the yml / properties in the classpath of the source ( resources folder ) .
Using this, we can override any property per environment without changing the source code or creating a new build. You could see that in the script for starting boot application, we have used the –spring.profiles.active=”staging” which will get precedence. If there are multiple properties to be overridden, we can put them in a yml / properties file in the same folder as the jar file.
This is a very handy option when we are testing a feature and need to load different configurations.
Startup banner
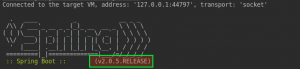
You have the ability to set a custom startup banner at the time of starting a new application. This may not be particulary useful. But the default banner itself shows some handy information during the startup.
If you look at the image below, you can see that the banner is displaying the current version of the spring boot being used. These can be customized to display the version number of the application.
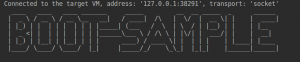
You can create custom ascii art and put it under a banner.txt file to display the content. For creating a customer ascii text, you can go to this website .
Conclusion
There are still more configuration and utilities provided by spring boot and we will be working on a part 2 for the same. Hope that the above points are useful from a go to production perspective of a spring boot application. Kindly let us know your comments and queries in the comment section.
regards
Microideation


1 Response
[…] If you want more details on how to configure multiple profiles and its advantages, refer to the following blog post. […]