Connecting to AWS EC2 instances using AWS CLI Session Manager from a Mac terminal with multiple profiles securely
The AWS SSM ( Session Manager ) allow SSH to the instances without requiring the key pair and whitelist. This is directly allowed from the AWS console through System Manager -> Session Manager. Though accessing from the AWS console is convenient, many of us may miss using a proper terminal application ( like iTerm2 ).
We can set up access to the instances using SSM with the use of AWS CLI and some configuration to the account from which we are going to access the instances. Let’s see them in this blog post.
Pre-requisites
AWS CLI
Before we start the setup, it is necessary to have the AWS CLI installed and configured in the system where you are trying to access it.
Go to the below link and follow the instruction for your respective platform.
https://docs.aws.amazon.com/cli/latest/userguide/getting-started-install.html
Once the installation is complete, you can run the below command from the terminal and it should give the details of the AWS CLI version.

AWS account with programmatic access
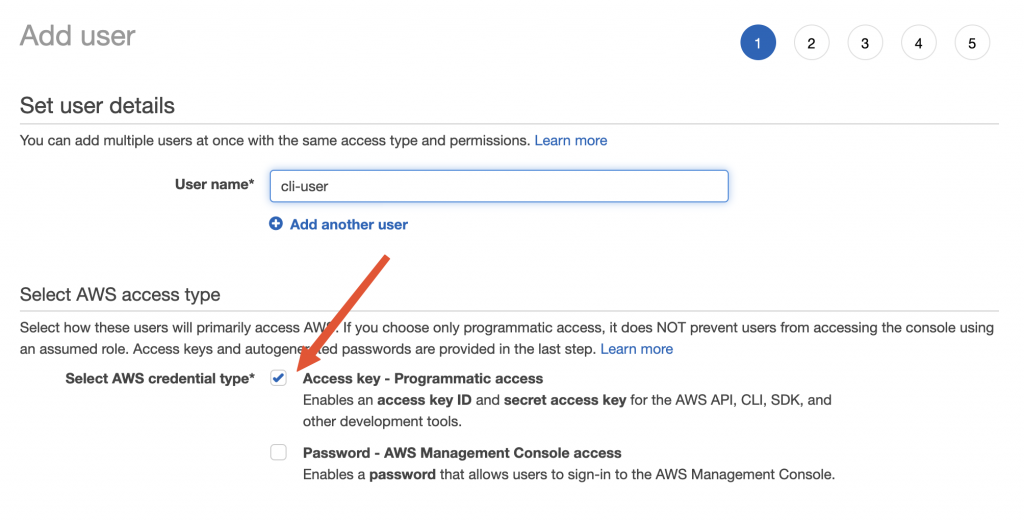
For using the AWS CLI, you need to have a user account with programmatic access enabled in the AWS account. This will provide you with the access key and access secret that are required for connecting the AWS CLI with your AWS account.
You can go to your AWS account -> IAM -> Users -> Add User ( Choose programmatic access ) and enable the relevant access rights and create the user. This will provide you with an accessKey and access secret that you need to note down and provide during the AWS CLI configuration.
Configure AWS CLI
Once the installation is done, we need to do some basic configuration for the AWS CLI to connect to an account.
Run the below command
$ aws configure
AWS Access Key ID [None]: AKIAIOSFODNN7EXAMPLE
AWS Secret Access Key [None]: wJalrXUtnFEMI/K7MDENG/bPxRfiCYEXAMPLEKEY
Default region name [None]: us-west-2
Default output format [None]: json
This will ask you for some details about the account for setting up the access. Provide the access key and secret received in the previous step. Provide the default region ( where you have the servers. This can be changed later ). For the output format, choose “JSON”.
Reference: https://docs.aws.amazon.com/cli/latest/userguide/getting-started-quickstart.html
Configure SSM plugin
Now that AWS CLI is set up, let’s install the plugin required for SSM access.
Install Plugin
Run the below commands one by one for downloading and installing the session-manager plugin.
curl "https://s3.amazonaws.com/session-manager-downloads/plugin/latest/mac/sessionmanager-bundle.zip" -o "sessionmanager-bundle.zip"
unzip sessionmanager-bundle.zip
sudo ./sessionmanager-bundle/install -i /usr/local/sessionmanagerplugin -b /usr/local/bin/session-manager-plugin
session-manager-plugin
The last step should give a response as below:

Accessing an instance
Once the SSM plugin setup is done, we could access an instance using the below command format.
aws ssm start-session --target <instanceid> --region ap-southeast-1
We can access an instance using the instance-id of the instance from AWS. Note that you can override the region here. If the instance is in the same region as the default, you may skip the --region section.
This should start an SSM session ( as long as you are able to access the same from the AWS Session manager without any issues ).
Setting up different credentials ( Profiles )
There is a very good chance that you are using different AWS accounts for accessing different instances ( may be based on region or client ). The AWS CLI allows us to configure different credentials and associate them with profiles so that we can specify the profile during a command and the AWS CLI will use the respective credentials for access.
By default, AWS CLI stores the credentials in an open file ~/.aws/credentials and the associated configuration under ~/.aws/config
We will see about securing the credentials file and loading it from a secure location in the subsequent section.
Define multiple credentials ( profiles )
We can define different credentials related to different environments in the credentials file as below.
[default]
aws_access_key_id = KSLDJFLKSJFKLJSF
aws_secret_access_key = jksdfjksldfjlskdjflksjdflksdjflksjdf

[produser]
aws_access_key_id = KLSJDLKJAKLDFJSDKLFJ
aws_secret_access_key = lkdjfklsjflksjflksdjflskjfklsjdf
Here, we have 2 profiles:
- default → Will be used when no
--profileis specified in the command - produser → This will be used if the command is having
--profile produser
Define configuration for profile ( region, output etc )
We can also have a user-specific configuration in the config file. Edit the ~/.aws/config file and put the content below
[default]
region=ap-southeast-1
output=json

[profile produser]
region=ap-southeast-1
output=json
In the config file, there are 2 configurations
- default → Will be used when no
--profileis specified in the command - produser → This will be used if the command is having
--profile produser
Note: For a profile-specific configuration, we prefix the username for the config with the prefix profile
Execute command with profile
Once there are multiple profiles, we could execute an AWS CLI command with the respective profile using the below format.
aws ssm start-session --target <instanceid> --profile produser
This will use the credentials for the produser from the credentials file and also the configuration for produser from the config file.
Note that the
--profileis not just applicable for the session-manager commands. It can be used for any command that we run using the AWS CLI.
Securing the credentials and config
By default, AWS CLI stores the credentials in an open file ~/.aws/credentials and the associated configuration under ~/.aws/config and this is visible to anyone and is not secure. A more secure way would be to use an encrypted volume ( like a vault ) that you can decrypt and mount as required.
For this, we need to be able to move the ~/.aws/credentials and the ~/.aws/config file to the custom location.
Load AWS CLI credentials and config file from a custom location
- Move the credentials file from
~/.aws/credentialsto a secure location ( like a vault or an encrypted volume. Similarly for the config file as well. - In your
~/.zshrcfile, export the following environment variables by specifying the new path to the respective files
# Set the path for the secure credentials from vault for the AWS CLI
export AWS_SHARED_CREDENTIALS_FILE="/Volumes/vault/personal/aws-cli/credentials"
export AWS_CONFIG_FILE="/Volumes/vault/personal/aws-cli/config"
- In the terminal window, run the following command
source ~/.zshrc
- For the new windows, this will be automatically applied.
From now onwards, whenever you execute the AWS CLI command, it will load the credentials and the config from the path specified by AWS_SHARED_CREDENTIALS_FILE and AWS_CONFIG_FILE
Footnotes
In this post, we have seen the setup of AWS CLI, installation of SSM plugin and configuring the AWS CLI to secure the configuration and credentials file in a custom location.