SonarQube: Part 1 ( Introduction, Setup using Postgres, Project configuration )
If you are an experienced developer or a newbie working on an enterprise ( or any serious ) project, you may end up writing code that contains code smells, security loopholes, and also breaking some best practices.
It may not be always possible to manually go through the code and review it line by line. Even if there is a review process, the manual process can always overlook things and these could end up in production as a ticking time bomb. This is where an automated code analysis tool like SonarQube becomes relevant in enforcing the quality as well as the detection of potential security vulnerabilities.
This is a two-part series on SonarQube.
- The first part ( this ) will cover the basics, setup and configuring of a project in SonarQube.
- Second part is more focussed on understanding the analysis report and on how take the action for a better code base.
SonarQube
Though there are many code analysis tools, SonarQube is a long-standing and number one choice for many enterprises that are serious about the code quality and the security of the applications.
There are multiple versions of SonarQube available. For our purpose, we will be using the “Community edition” that is free and open-source. If you are trying it out for the first time or are planning to use it for a personal or small-scale project, the community edition is more than enough.
You only need to consider the enterprise edition if you are planning to implement it as part of the whole organization and want to collaborate with many users and cross-functional teams.
Even though the product is very powerful and comprehensive, the setup is fairly simple and you could do it on your personal laptop or on a small server ( if want to share it ) without much hassle. We will go through the setup in this post.
Why do we need SonarQube?
Given the current scale at which development and shipping happen in an organization, the chances of a manual review missing a critical error are quite high. No level of experience can guarantee a 100% secure and quality code. Also, when the team involves juniors who are not very experienced, there will be a lot of reviews required and any miss could be fatal.
Moreover, we can read news about different organizations being hacked and vulnerabilities being exploited on a daily basis. Though most of them are due to the negligence of some key personnel, a sophisticated attack can easily get access to a system with known vulnerabilities.
If we are to ship quality code at a high velocity, the only way is to have an automated process that checks the code for all known vulnerabilities while enforcing certain standards. This can only be achieved through a tool like SonarQube.
Workflow for code analysis tool
- Developer pushes the code to branch
- Code analysis tool ( SonarQube ) will be having an engine that run analysis on the code pushed against a set of rules & validations for checking the quality.
- If the code does not meet the minimum requirements, it gets blocked by the quality gates and considered as not eligible for production.
- The issues will be reported to the developer and re-run once pushed again.
Installation
Enough talking. Let’s get to the meaty stuff and get our hands dirty by setting up the SonarQube on a development system. The steps and screenshots are from a Mac system. But the process will be similar even if you are on a Windows or Linux system.
Dependencies
Before we start with the installation of the SonarQube, we need to ensure that we have got the relevant dependencies required for running it.
Database
SonarQube requires a database for running. It supports
- Oracle
- MS SQL
- PostGres
We will be installing Postgres on our system as it’s lightweight compared to others.
Java
SonarQube requires the latest Java for running the scanners and other tools. It supports Java 11 officially as of now.
Irrespective of the version of Java installed for SonarQube, it can run analysis on any Java version of source code.
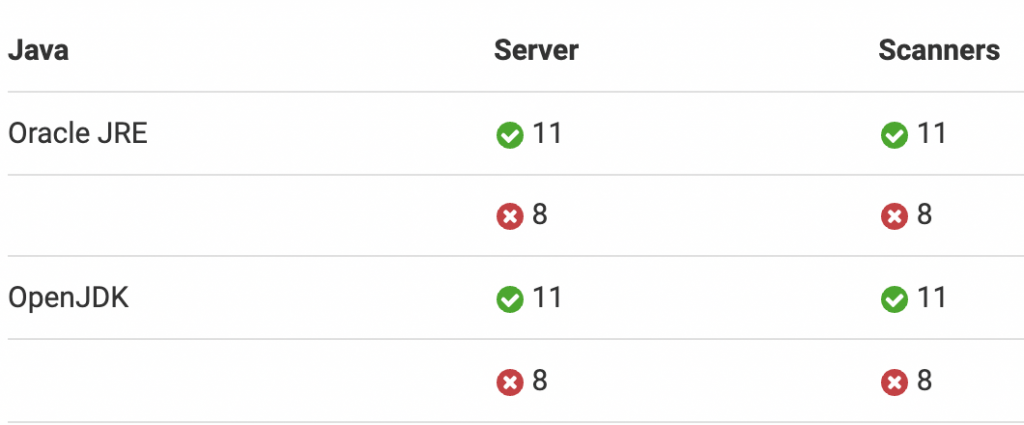
I assume Java 11 to be installed in your system. If not, please follow any online tutorial for getting Java installed on your respective operating system.
Installing and configuring Postgres
Let’s install the Postgres database and get it running.
install using homebrew
brew install postgres
Once the installation is complete, make sure that it’s running by executing the below command
brew services start postgres
Once the setup is done, we can go ahead and configure the database and users for SonarQube to use.
Note that the default super admin user for Postgres will be created as the currently logged in system user. The password is empty ( no password )
Configure the users and database
Let’s create the database and users that will be required by SonarQube. We are using the database as sonarqube, username as squser and password as sqaccess. You may change these values as required.
$> psql postgres
$> create database sonarqube;
$> create user squser with encrypted password 'sqaccess';
$> grant all privileges on database sonarqube to squser;
Installing SonarQube
Let’s install the actual SonarQube application
Download
This is the easiest part. You just need to download and unzip the zip file.
- Go to the downloads section and choose the “Community option”.
- Extract the zip file to a location of your choice. From this moment onwards, the location to which you have extracted the zip will be referred to as $SONAR_HOME
Configuration
We need to configure the Postgres details into the SonarQube configuration before we can start the services.
Edit the file sonar.properties file in the $SONAR_HOME/conf folder and update the below section
sonar.jdbc.username=squser
sonar.jdbc.password=sqaccess
// NOTE: The original string will have currentSchema param passed
// If that is need, we need to configure schema separately in the postres
// Else remove it so that sonarqube uses the default 'public' schema
sonar.jdbc.url=jdbc:postgresql://localhost/sonarqube
If you have used different details in the Postgres, please use that information. Once updated, then save the file.
Starting SonarQube
Now that all the configuration is done, let’s start the services. Ensure that the Postgres service is running ( by checking the brew services list ).
- Go to $SONAR_HOME/bin/{os-version} folder.
Eg: If you are on mac, go to foldermacosx-universal-64 - Make the file
sonar.shexecutable
chmod u+x sonar.sh - Run the program
./sonar.sh start
This will start the SonarQube as a web application listening to port 9000 ( You can change this on the sonar.web.port property of the sonar.properties file )
Put the address http://localhost:9000 in your browser.
Note that the SonarQube application will take some seconds to start up and hence if you goto the address immediately , it may not have initialized. Please try after some seconds and should be up and running.
SonarQube Configuration
Once the sonar cube is up and running, the next step is to configure it and add a project that needs to be analyzed for code quality and vulnerabilities.
First time access
When you access the URL for the first time, SonarQube will ask you for a login. The default username and password are “admin”, “admin”.
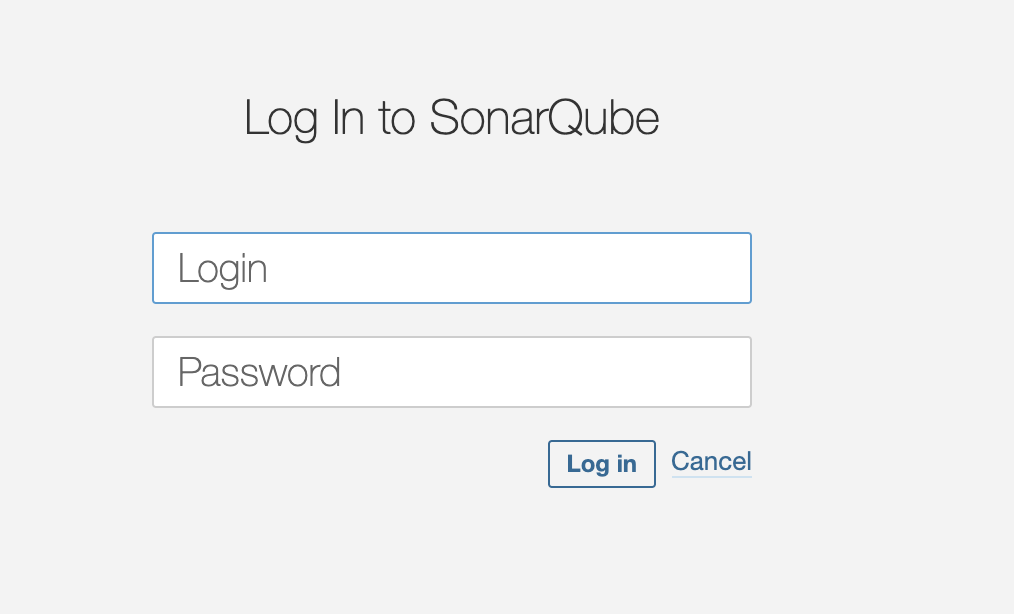
Once logged in, it will ask to reset the password and you can provide a password of your own. Make sure to note it down.
Create a project
The dashboard right after login will look like this:
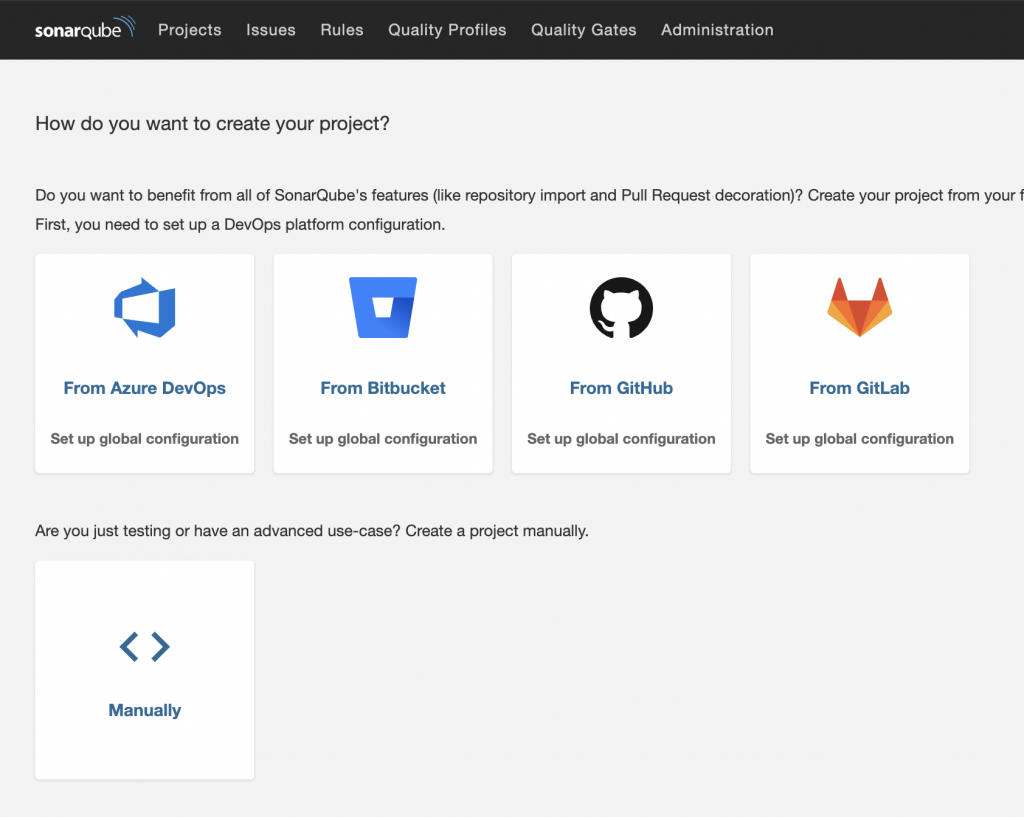
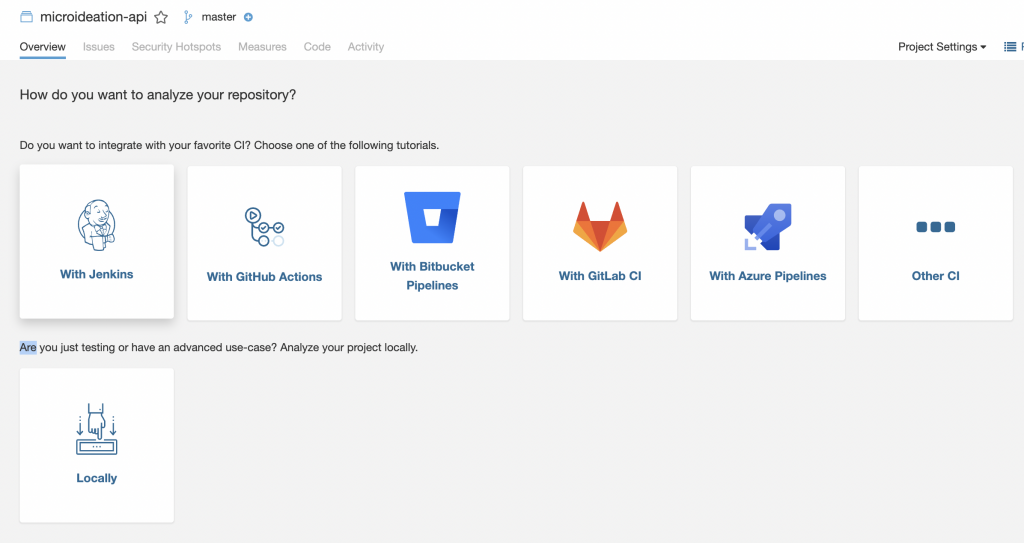
There are multiple options in SonarQube for setting up a project. You could connect it to the common version control systems ( GitHub, GitLab, BitBucket ) or can set up a project that you have locally. Connecting with a version control system allows creating a workflow for analyzing the branches and PRs for vulnerabilities and adding the comments based on the analysis.
For the current workflow, we will be using the project that is running locally as that is the quickest way to get things rolling.
Manual project setup
Click on the “Manually” option.
Provide a name and key for the project. You may keep the same or separate. We will be using the project key at a later stage while running the analysis.
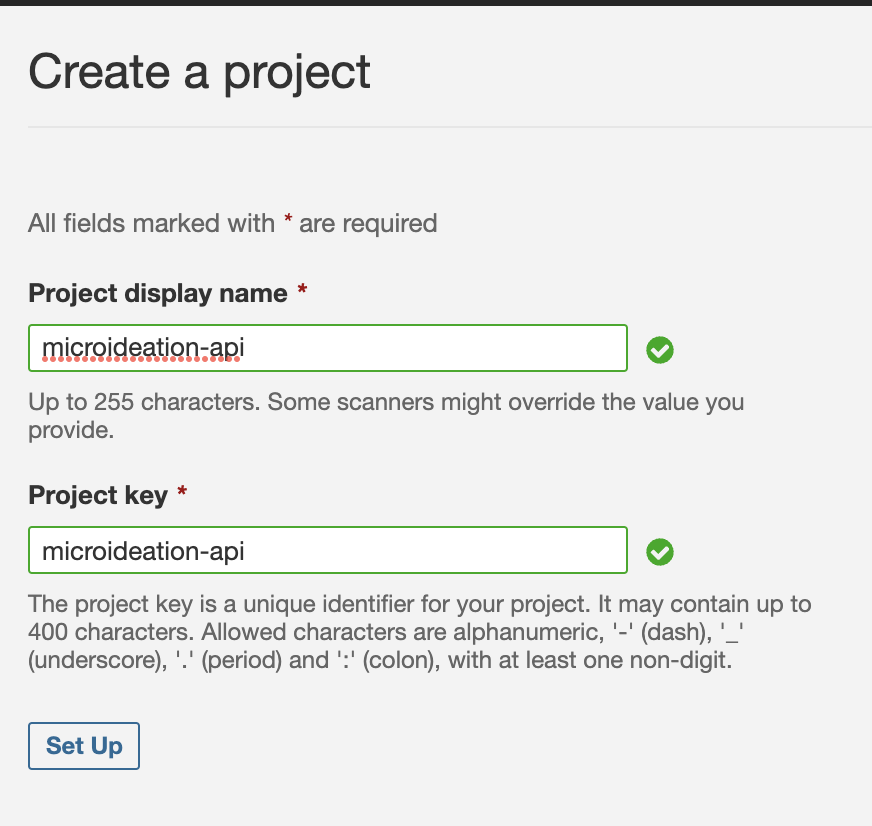
Click on Setup and you will be asked to provide details on how to integrate the project ( whether to use a CI / CD pipeline or local ).
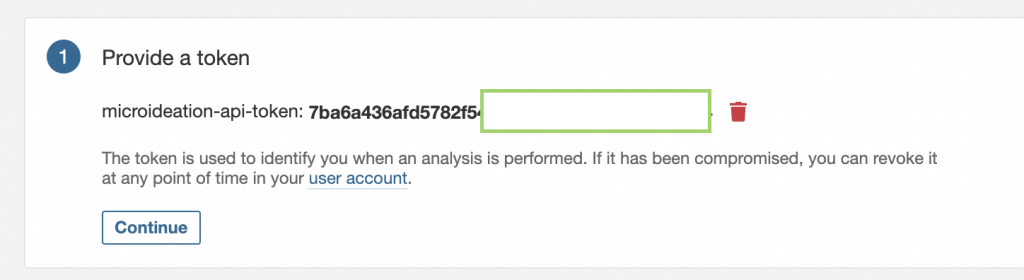
Tap on the “Locally” option and you will be asked for creating a token. This is an authentication token that you need to keep safe as we require it for running the analysis. You could either create a new one (first-time option ) or use an existing token ( in case you are coming back to SonarQube with an already existing project token ).
Provide a name to the token and click on “Generate”

You will be able to see the token on the next screen and need to take a copy of that and keep it handy.
Click on “Continue” and you are ready to run the analysis. You will be given the option for different build tools like Maven, Gradle, etc.
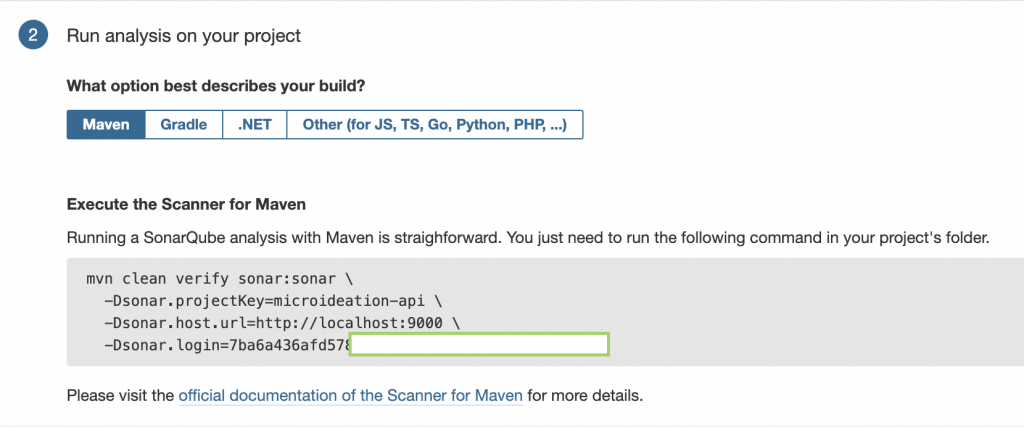
You can copy the provided maven command ( or Gradle ) and run it on the project folder ( assuming it is set up on maven ). This command will run the maven goal sonar:sonar bypassing the project key, SonarQube URL, and the login ( token ).
We will see how to set up the Jococo plugin on the project before we run the above command as that is required for reporting on code coverage by the test cases.
Handling analysis errors
You need to ensure the following before you run the sonar command.
- Project need to be setup properly using Maven.
- Make sure that project ( and its modules ) are all compiling successfully.
- All the test cases should be passed for the analysis to complete.
Conclusion and Part 2
We will conclude this post at this point. We will be covering the following items in part 2.
- Jococo setup on project for code coverage
- Analyzing of the report
- Getting information on reported issue
- Fixing vulnerabilities for getting a better score on the analysis
- Conclusion


2 Responses
[…] If you have not seen the first part, please check SonarQube: Part 1 ( Introduction, Setup using Postgres, Project configuration ) […]
[…] SonarQube: Part 1 ( Introduction, Setup using Postgres, Project configuration ) […]