Simple two node Hazelcast cache cluster using TCP IP
Most of the modern application architectures use a caching layer for reducing the response times. The caching layer sits between the data access layer and an API layer in a basic use case. There are different providers for caching and each of them has got their own strengths and weaknesses. The common providers that immediately come to my mind are Redis, Google guava, Hazelcast etc. We extensively use Hazelcast in our applications primarily due to its distributed caching support and the ease of setup. Let’s see how we can set up a two node Hazelcast cluster which communicates over TCP / IP.
Prerequisites
Following things are required before you could start Hazelcast
- Hazelcast is built on Java and it is mandatory to have JRE installed in your system prior to the installation of Hazelcast.
- The default port for Hazelcast is 5701 and 5702. This need to be opened between the Hazelcast instances and also between the instances where the applications connecting to Hazelcast resides.
Installing Hazelcast
Lets assume that we have two servers on which we want to install Hazelcast. Lets assume the following details.
- Server 1 with internal IP 10.140.0.2
- Server 2 with internal IP 10.140.0.3
Let’s follow the below steps for installing Hazelcast :
- The first step is to download the Hazelcast zip file from here. The current version as of this writing is 3.10.5
- Download the zip file to a location of your choice in the Server1 and Server2
- Extract the zip file
Make sure that the above steps are done in both Server 1 and Server 2.
That’s it for the installation part. At this point, we can start the Hazelcast instance from the bin folder of the extracted directory. But let’s configure the clustering details and then start the servers.
Configuring Cluster for Hazelcast
For editing the cluster configuration, we need to let each Hazelcast instance know the IP of the other instance. This is configured using the hazelcast.xml file.
- In the Server 1, Goto Hazelcast INSTALLATION_DIRECTORY/bin
- Open the hazelcast.xml file in your favourite editor
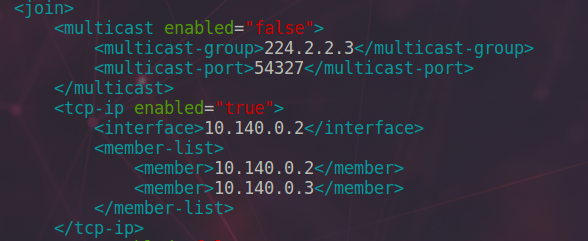
$ vim hazelcast.xml - Goto the section that says “<join>”
- Under the “<join>”, there will be multiple options that are available for joining the cluster. We need to look at the option that says <tcp-ip>
- Change the “enabled” attribute to “true”
- Find the internal IP of the Server 1 ( In my case it was 10.140.0.2 ). Now put this inside the <interface></interface> tags.
- Now under the <member-list> tags, we need to add the Server 1 IP and Server 2 IP as <member>
- Save and close the file.
You will have your configuration as below after the above changes are completed:
Do the same configuration in the Server 2 as well. You need to change the interface IP to the internal IP of the Server 2 ( in our case it was 10.140.0.3 )
Starting the cluster
Once the configuration is completed, we can start the servers one by one. Follow the below steps for starting the instance.
- Goto Hazelcast INSTALLATION_DIRECTORY/bin folder.
- Run the start.sh or start.bat file
- This would bring up the logs as below where you can see that the Server 1 is up and running and that its the only member in the cluster.
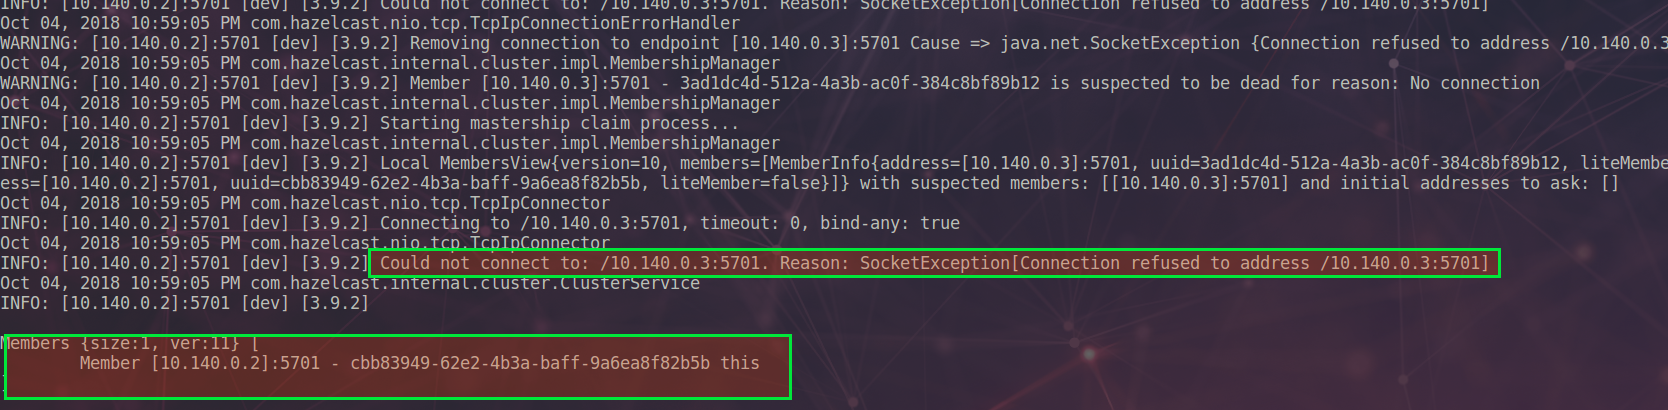
You can see that the instance tried to contact Server 2 ( 10.140.0.3 ) as it was configured as a member, but since it was not running, the instance received Socket exception and the current member list is displayed with only Server 1 as member - Now go to the Server 2
- Goto Hazelcast INSTALLATION_DIRECTORY/bin folder.
- Run the start.sh or start.bat file
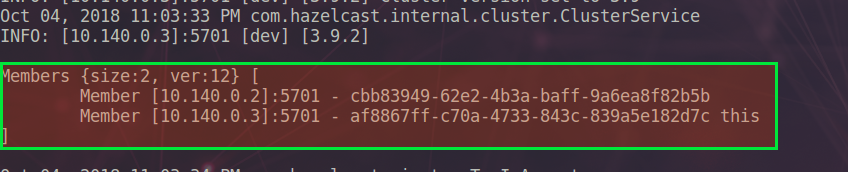
- At this point, you should be able to see that the Server 1 was contacted successfully and the member list contains both the members.
You can configure your applications to connect to either of the instances and the cache entries will be replicated on both the servers.
In case the Hazelcast instance was stopped abruptly, you will need to remove the hazelcast_instance.pid file in the bin folder. If you try to start the Hazelcast with this file present, you will get an error that the instance is already running.
Conclusion
Caching is definitely a great option to increase the response time for the application. But its more important to make sure that we have the cache configured in a distributed manner for increased reliability. Hazelcast is a great choice for distributed caching and using the above method you can quickly configure a two node cluster.
Let me know in case you have any queries or comments.
regards
Microideation


2 Responses
[…] how we are using it in our environment and how to create a simple two-node cluster using Hazelcast here. Now we will see how we can add a management center which would give access to the cluster status […]
[…] Configuring hazelcast two node cluster. […]