Integration of messages from AWS SNS -> SQS -> Spring boot cloud messaging for high-traffic events
In the previous blog post, we integrated SNS directly from the Spring cloud application. We are able to receive messages from SNS now as HTTP callbacks. But this is not an ideal situation as in a high-traffic environment, it can quickly put our spring service under pressure and there are chances of lost messages.
An ideal production setup would be
- SNS posts to SQS ( Simple Queue Service )
- Spring boot application listens and polls the SQS for content ( using long polling preferably )
- SQS uses a dead letter queue for any messages that are failed to process.
In this post, we will see how to achieve this setup with the necessary configurations and code changes required.
Use-case
We need to achieve the below objectives
- Configure an SNS topic
- Create an SQS queue.
- Add a subscription on SNS topic to the SQS queue.
- Add necessary policies on SNS and SQS.
- Configure Spring boot ( using spring-cloud-aws-messaging ) to long poll the messages from the SQS.
Configuration & Setup
Create an SNS Topic
We have already covered this in the last post, but we will be repeating the same steps again for the completeness of this post.
- Sign in to AWS Console -> Search for SNS
- Click on Create Topic and provide a name for the topic ( In my case, I am using
MyTopic) - Choose the Type
Standardfor now ( the other option isFIFOthat guarantees single delivery and order, but the max TPS will be restricted to 300/s ). - Leave the other options as default.
- Save the configuration.
Once the SNS topic is created, Click on the Topic and it will display the ARN for the topic. Note this down as we will need it during the next steps.
Create an SQS queue
Next is to define an SQS queue that will receive the events from the SNS.
- Sign in to AWS Console -> Search for SQS
- Click on “Create Queue”
- Choose the option “Standard” ( this does not guarantee the ordering of the events but provides insane throughput. If you need to guarantee to order, then you can use FIFO, but the throughput will be limited to 300/s )
- Provide a name for the queue
- Disable the encryption ( for the simplicity of setup, but recommended to enable this for production setup )
- Leave the access policy as the default.
- Create the queue
Update the access policies
Let’s add the I AM Policy to be used for SQS and also we need to provide SNS the access rights to Send messages to the SQS queue.
Add SQS access for the IAM role ( Spring cloud app user )
Please refer to the previous post regarding the IAM user creation. We can add the following statement to the existing policy so that the user will have access to the specific SQS for reading. We will use the accessKey and accessSecret of the user with this role/policy in our cloud application.
{
      "Sid": "VisualEditor1",
      "Effect": "Allow",
      "Action": [
          "sqs:DeleteMessage",
          "sqs:ListQueues",
          "sqs:GetQueueUrl",
          "sqs:ListDeadLetterSourceQueues",
          "sqs:ChangeMessageVisibility",
          "sqs:ReceiveMessage",
          "sqs:SendMessage",
          "sqs:GetQueueAttributes",
          "sqs:ListQueueTags",
          "sqs:SetQueueAttributes"
      ],
      "Resource": [
          "<arn of the queue>"
      ]
  }
Replace the <arn of the queue> with the ARN that you received when the SQS queue was created.
Allow SNS topic to SendMessage to SQS
By default, SNS will not be able to publish the messages to SQS, we require to add the necessary permissions.
Goto new queue -> Access Policy and edit the policy. Add the below statement to it.
{
      "Effect": "Allow",
      "Principal": {
        "Service": "sns.amazonaws.com"
      },
      "Action": "sqs:SendMessage",
      "Resource": "<arn of the queue>",
      "Condition": {
        "ArnEquals": {
          "aws:SourceArn": "<arn of the topic>"
        }
      }
    }
Make sure to replace the <arn of the queue> with your queue ARN and the <arn of the topic> with our topic ARN
Add SQS subscription to SNS topic
Now that we have both the queue and SNS topics defined, it’s time for us to link them up so that SNS can push the messages/events to SQS.
- Goto to SNS -> Topic ( created by you ) -> Subscriptions
- Choose the Protocol as “Amazon SQS” and this will provide a dropdown with the list of SQS queues that are defined in the same region and account. Choose the ARN for the queue that was defined.
- Ensure that we check “Enable raw message delivery”.
If this is not enabled, the message that is pushed to SQS will be in the format of an SNS Notification JSON string and we would require to parse the object and read the Message field for the actual payload. With the above option checked, we will receive the message ( text ) as is in the SQS in the raw form. - If you want to restrict the pushing of messages to be based on some attributes from the SNS topic, that can be configured in the “Subscription filter policy”.
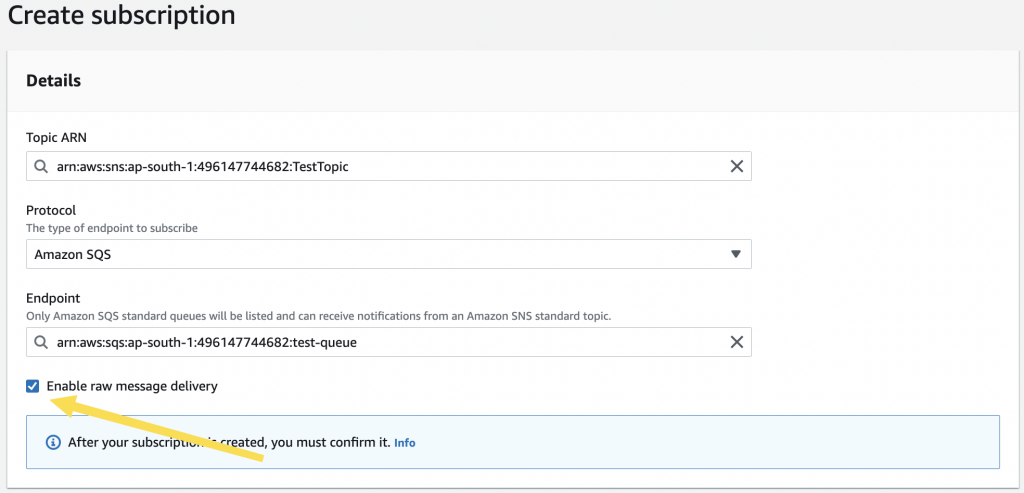
Save the configuration and it should show the subscription as “confirmed”.
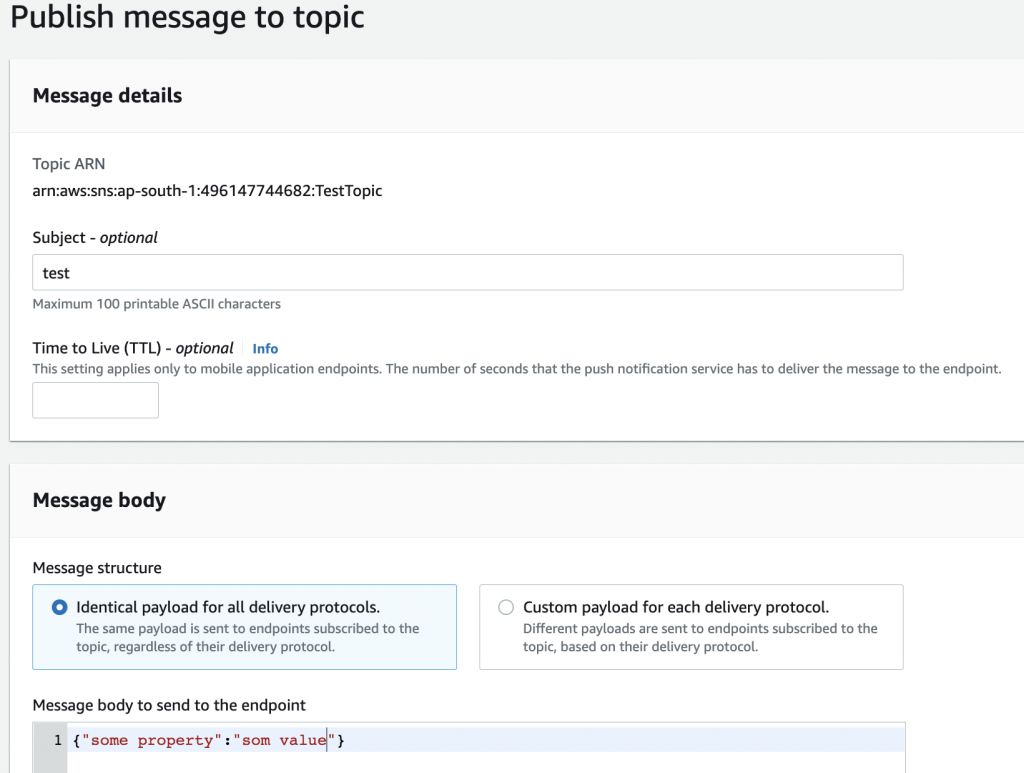
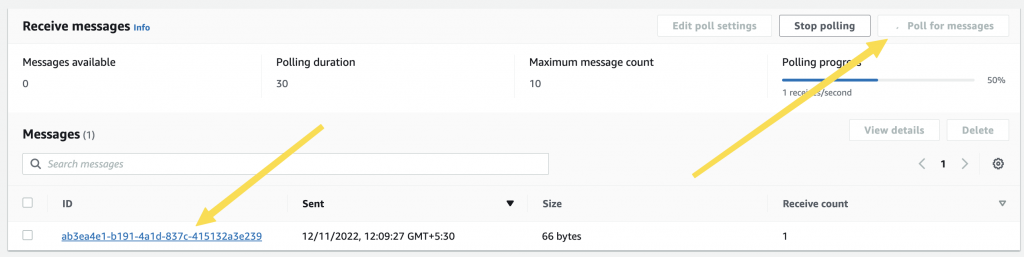
Testing SNS to SQS push
We can test the pushing to the SQS right from the AWS console itself.
- Goto Topic -> Choose the topic and click “Publish Message”
- Add the details and click on Publish.
- Go to the Queues -> Choose the queue -> Send or receive messages.
- Click on “Poll Messages” and the message that you sent should be there.
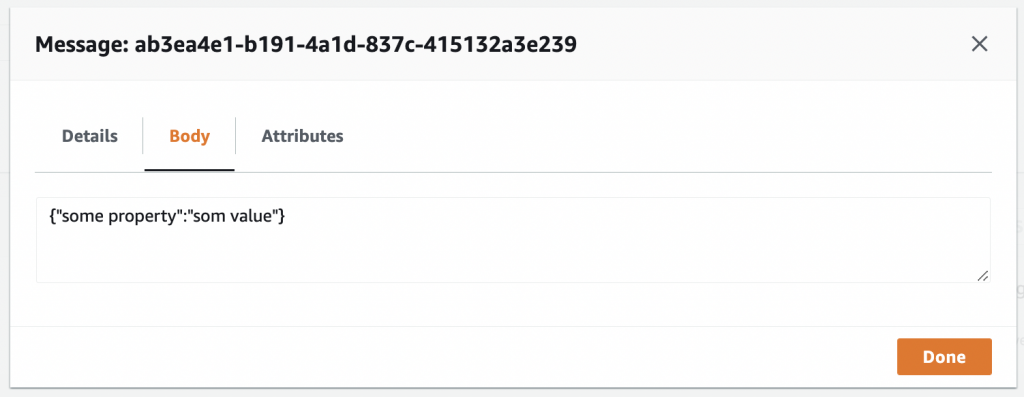
- You can click on the message to view the content
Publish From SNS
Receive on SQS
Spring boot application
Create a new Spring boot project by going to https://start.spring.io and choosing the Web and Spring cloud dependency
Dependencies
Add the below dependencies
<!-- Need for the AWS SQS and SNS functionality -->
<dependency>
	<groupId>org.springframework.cloud</groupId>
	<artifactId>spring-cloud-aws-messaging</artifactId>
</dependency>
<!-- Need for the auto configuration of AmazonSNS and AmazonSQSAsync beans
     based on the cloud.* properties in yml file
 -->
<dependency>
	<groupId>org.springframework.cloud</groupId>
	<artifactId>spring-cloud-aws-autoconfigure</artifactId>
</dependency>
The spring-cloud-aws-messaging provides the AWS SDK wrapper integration for SNS and SQS. spring-cloud-aws-autoconfigure is used for auto-configuring the beans based on the settings specified in the XML file
AWS Config class
Create an AWS config class where we will add the following annotations. Make sure to tab it as @Configuration. Note that you can do this on the main application class also, but for a better organization of configs, we will do it in a dedicated config class.
import org.springframework.cloud.aws.messaging.config.annotation.EnableSns;
import org.springframework.cloud.aws.messaging.config.annotation.EnableSqs;
import org.springframework.context.annotation.Configuration;

@Configuration
@EnableSqs // Needed for recognizing and handling Sqslistner annotated methods
public class AWSConfg {

}
YAML configuration
For the spring AWS auto-configuration to work, we will need to provide it with the following configuration details. You can use the application.properties or application.yml file. The example below is for the YAML file. Note that this only contains the cloud-specific settings.
# spring-cloud-aws-messaging cloud configuration for auto-configuration
# of the AmazonSNS & AmazonSQSAsync
cloud:
  aws:
    credentials:
      accessKey: <accessKey>
      secretKey: <acessSecret>
    # Required to avoid getting metadata from EC2 instance
    # turn off if we are running inside a EC2 instance on
    # same region
    # Reference : https://stackoverflow.com/a/54436955
    stack:
      auto: false
    region:
      auto: false
      static: ap-south-1
Replace the <accessKey> and <accessSecret> with the accessKey and secret of the user to whom we have assigned the policy for SQS access in IAM.
Also, note that we are setting cloud.aws.stack.auto and cloud.aws.region.auto as false. Without this, aws-autoconfigure will try to get the metadata information from the running system ( assuming it to be an EC2 instance ) and fail the service starting if you are running locally. Also, since the auto-detect is off, we need to specify the region explicitly. Change the region based on the one you are using.
Listener class for polling the queue
Let’s create a service class and then we need to annotate it with @SqsListener for registering to a queue and then doing long polling.
import com.amazonaws.services.sqs.model.Message;
import lombok.RequiredArgsConstructor;
import lombok.extern.slf4j.Slf4j;
import org.springframework.cloud.aws.messaging.config.annotation.NotificationMessage;
import org.springframework.cloud.aws.messaging.listener.SqsMessageDeletionPolicy;
import org.springframework.cloud.aws.messaging.listener.annotation.SqsListener;
import org.springframework.messaging.handler.annotation.Header;
import org.springframework.stereotype.Service;

import java.util.Map;

@Service
@Slf4j
@RequiredArgsConstructor
public class TestSQSListener {


    @SqsListener(value = "test-queue",deletionPolicy = SqsMessageDeletionPolicy.ON_SUCCESS)
    public void receiveTestSQSEvent(
            String message,
            @Header String LogicalResourceId
    ) {
        log.info("testReceiveEvent -> Message :{},logical_resource_id:{}",message,LogicalResourceId);

    }
}
We have done the following here:
- Created a service class with
@Serviceannotation - Added a method that receives the payload as String ( message param ) and another header of SQS
- Annotated the method with
@SqsListenerspecifying the name of the queue ( Make sure to specify the simple name of your queue and not the ARN here) and also thedeletionPolicyas delete on success.
The above steps will make spring-cloud start a long polling session with the queue. Long polling ensures that we are making only controlled calls to the queue. This may introduce a slight delay in the message delivery but reduces cost. You can read more about short polling vs long polling.
SQS requires the client application to explicitly delete a message once consumed. When we add the deletionPolicy = SqsMessageDeletionPolicy.ON_SUCCESS, spring-cloud will delete the message when there are no exceptions on the listener method. There are other options also available that you can check.
Note that we have a String message param in the method. Since we have enabled raw message delivery, the message content will be delivered as a string.
The @Header annotation will put the content of the header matching the name of the param into the param. The LogicalResourceId carries the queue name. There are other headers also that can be captured.
Testing the setup
You are now ready to receive the SQS messages in your cloud application.
- Start the application and ensure that you don’t have any errors or exceptions reported during the startup.
- Goto Topic -> Publish message and put in the details for a test message
- If all the configurations are good, you should receive the message in your application.

Troubleshooting
Message not received
- Check and ensure that the method is annotated with
@SqsListener - Verify that the class is a
@Serviceannotated - Cross-check the queue name and param
- Make sure that the AWSConfig is having
@EnableSqsannotation.
Error during startup ( Queue not found or unavailable )
- Check and ensure that the configured accessKey and secret are for the users with the right policies assigned.
- Ensure that the region configured in the YML is where the queue is residing
Next steps
Now we have our SNS messages delivered to the SQS and is highly scalable. But we have still not configured a dead-letter queue for the messages that are not processed. We will check about that on the next blog post.
Also, from your side, you could enable encryption for the queue. You would require to make some access policy changes to the SNS topic for having access to the KMS key used by SQS.