Integrate AWS SNS with Spring Boot using spring-cloud messaging for HTTP callback hooks
AWS SNS ( Simple Notification Service ) is a managed messaging service that can be used in applications for publishing and subscribing to topics ( a channel ).
Initially started as a means to post notifications for communication delivery ( SMS, Email, Push Notifications, etc ), now it has expanded a lot and can be used as a tool to transfer ( or fanout ) events to different subscribers within the AWS account or with account outside the org.
Now there are many organizations that use SNS as a tool to publish events pertaining to their applications that can be subscribed to by integrating services as this does not put a load on their applications. AWS allows publishing or subscribing to SNS topics that are in a different AWS account by means of proper policy and trust relationships in the roles.
Our Usecase
Since the Spring framework is mostly used for enterprise integrations, there is a very good chance that you will require to integrate to SNS for your own org or for an org outside.
In this post, we will be integrating an SNS topic using Spring boot based on the HTTP protocol subscription. Following are the things we will be achieving.
- Create an SNS Topic
- Create a user with access to only subscribe ( we are going to mimic an integration where the publish is happening from a different account and we are receiving the events in SNS )
- Spring boot integration steps
- Configuring of HTTP subscription
- Publishing test events and receiving them.
Configuration & Setup
Let’s see the setup for achieving this.
AWS SNS Setup
Let’s start by creating an SNS topic in AWS.
- Sign in to AWS Console -> Search for SNS
- Click on Create Topic and provide a name for the topic ( In my case, I am using
MyTopic) - Choose the Type as
Standardfor now ( the other option isFIFOthat guarantees single delivery and order, but the max TPS will be restricted to 300/s ). - Leave the other options as default.
- Save the configuration.
Once the SNS topic is created, Click on the Topic and it will display the ARN for the topic. Note this down as we will need it for the next step
IAM User for SNS access
Now let’s create an IAM user with access to the specific SNS for subscription
Goto IAM -> Create User and define a user with only Programmatic Access ( we are only going to use this user for the subscription to the events )
Create a policy with the following access rights
{
    "Version": "2012-10-17",
    "Statement": [
        {
            "Sid": "allow_subscription_confirmation",
            "Effect": "Allow",
            "Action": [
                "sns:Subscribe",
                "sns:ConfirmSubscription"
            ],
            "Resource": "<complete ARN of your topic>"
        },
        {
            "Sid": "allow_unsubscribe",
            "Effect": "Allow",
            "Action": "sns:Unsubscribe",
            "Resource": "<complete ARN of your topic>"
        }
    ]
}
Attach this policy to the user. Make sure to replace the Resource value with the ARN of the topic you created.
Also, ensure hat this is the only policy attached to the user for a clear boundary on what the user can perform.
Create the User and note down the AccessID and AccessSecret
Spring boot project setup
Let’s create the spring boot project and add the necessary dependency and integration logic
Create a new Spring boot project by going to https://start.spring.io and choose the Web and Spring cloud dependency
Dependencies
Add the below dependencies
<!-- Need for the AWS SQS and SNS functionality -->
<dependency>
	<groupId>org.springframework.cloud</groupId>
	<artifactId>spring-cloud-aws-messaging</artifactId>
</dependency>
<!-- Need for the auto configuration of AmazonSNS and AmazonSQSAsync beans
     based on the cloud.* properties in yml file
 -->
<dependency>
	<groupId>org.springframework.cloud</groupId>
	<artifactId>spring-cloud-aws-autoconfigure</artifactId>
</dependency>
The spring-cloud-aws-messaging provides the AWS SDK wrapper integration for SNS and SQS. spring-cloud-aws-autoconfigure is used for auto-configuring of the beans based on the settings specified in the XML file
AWS Config class
Create an AWS config class where we will add the following annotations. Make sure to tab it as @Configuration. Note that you can do this on the main application class also, but for a better organization of configs, we will do it in a dedicated config class.
import org.springframework.cloud.aws.messaging.config.annotation.EnableSns;
import org.springframework.cloud.aws.messaging.config.annotation.EnableSqs;
import org.springframework.context.annotation.Configuration;

@Configuration
@EnableSns // Needed for recognizing and handling SNS HTTP webhook subscription
public class AWSConfg {

}
YAML configuration
For the spring AWS auto-configuration to work, we will need to provide it with the following configuration details. You can use the application.properties or application.yml file. The example below is for the YAML file. Note that this only contains the cloud-specific settings.
# spring-cloud-aws-messaging cloud configuration for auto-configuration
# of the AmazonSNS & AmazonSQSAsync
cloud:
  aws:
    credentials:
      accessKey: <accessKey>
      secretKey: <acessSecret>
    # Required to avoid getting metadata from EC2 instance
    # turn off if we are running inside a EC2 instance on
    # same region
    # Reference : https://stackoverflow.com/a/54436955
    stack:
      auto: false
    region:
      auto: false
      static: ap-south-1
Replace the <accessKey> and <accessSecret> with the accessKey and secret we have noted down while creating the user.
Also, note that we are setting cloud.aws.stack.auto and cloud.aws.region.auto as false. Without this, aws-autoconfigure will try to get the metadata information from the running system ( assuming it to be an EC2 instance ) and fail the service starting if you are running locally. Also, since the auto-detect is off, we need to specify the region explicitly. Change the region based on the one you are using.
Controller for subscription
Finally, let’s define the controller that we will be using for the subscription.
import lombok.extern.slf4j.Slf4j;
import org.springframework.cloud.aws.messaging.config.annotation.NotificationMessage;
import org.springframework.cloud.aws.messaging.config.annotation.NotificationSubject;
import org.springframework.cloud.aws.messaging.endpoint.NotificationStatus;
import org.springframework.cloud.aws.messaging.endpoint.annotation.NotificationMessageMapping;
import org.springframework.cloud.aws.messaging.endpoint.annotation.NotificationSubscriptionMapping;
import org.springframework.cloud.aws.messaging.endpoint.annotation.NotificationUnsubscribeConfirmationMapping;
import org.springframework.web.bind.annotation.RequestMapping;
import org.springframework.web.bind.annotation.RestController;

@RestController
@Slf4j
@RequestMapping("/sns/subscriber/test-topic")
public class TestController {

    @NotificationUnsubscribeConfirmationMapping
    public void confirmUnsubscribeMessage(
            NotificationStatus notificationStatus) {
        log.info("confirmUnsubscribeMessage -> Request received");
        notificationStatus.confirmSubscription();
        log.info("confirmUnsubscribeMessage -> UnSubscribe confirmed");
    }

    @NotificationMessageMapping
    public void receiveNotification(@NotificationMessage String message,
                                    @NotificationSubject String subject) {
        log.info("receiveNotification -> Message :{}, Subject:{}",message,subject);
    }

    @NotificationSubscriptionMapping
    public void confirmSubscriptionMessage(
            NotificationStatus notificationStatus) {
        log.info("confirmSubscriptionMessage -> Request received");
        notificationStatus.confirmSubscription();
        log.info("confirmSubscriptionMessage -> Subscribe confirmed");
    }
}
There are a few things to explain here.
- Note that we have put the endpoint RequestMapping as a class annotation. The methods are only annotated with the spring-cloud-specific annotations that handle subscription, actual notification delivery, and unsubscribing.
The name path in the request mapping has nothing to do with the actual topic name. This is the endpoint that we will be configuring at the subscription screen for a webhook call back ( HTTP(s) ) @NotificationUnsubscribeConfirmationMapping→ will add the handling for confirming the unsubscribe option when SNS calls this mapping with the respective header value.@NotificationSubscriptionMapping→ Confirms the subscription call for the webhook from SNS ( based on the header in the request )@NotificationMessageMapping→ Parses the actual message received from SNS and we can access the message and the subject.
When we add this endpoint to the SNS subscription, SNS triggers a flow for confirming the subscription by calling the endpoint, and the endpoint needs to do a redirect and confirm. This flow is automatically handled by spring-cloud by the methods annotated by NotificationSubscriptionMapping
Note that all the calls ( subscription, unsubscribe and actual message ) will be calling to the endpoint specified at the RequestMapping. The individual methods are called based on the
x-amz-sns-message-typeheader
Add the HTTP subscription
Now that we have the topic and the endpoint defined, let’s go and configure the endpoint in the SNS topic as an HTTP subscription.
Note that we need to have the spring boot service running in a cloud or internet instance with a static IP address or domain mapped ( like your hosted test or dev env ) with public access enabled to the endpoint. As SNS is a cloud service, it should be able to reach your endpoint.
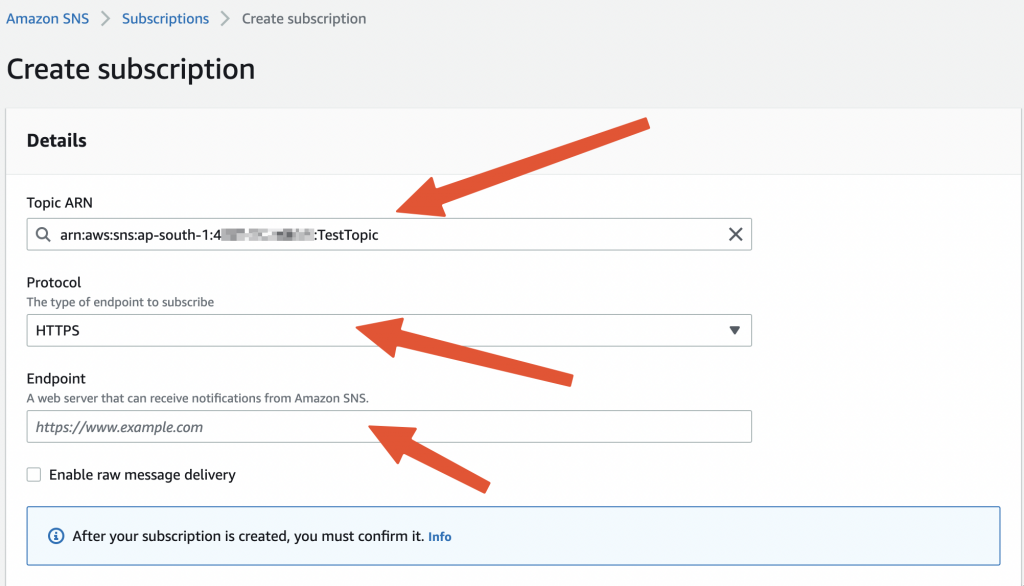
Goto SNS -> Choose the Topic and select Create Subscription
- Choose your Topic
- Choose the protocol as HTTP or HTTPS ( based on your hosted service configuration )
- Specify the complete endpoint ( Eg: https://test.microideation.com/amazontest/sns/subscriber/test-topic )
Save the subscription and it will try to call your endpoint for confirmation. If there are some issues contact your service an error message will be displayed.
You can view the list of successful subscriptions under the Subscriptions option on the left menu.
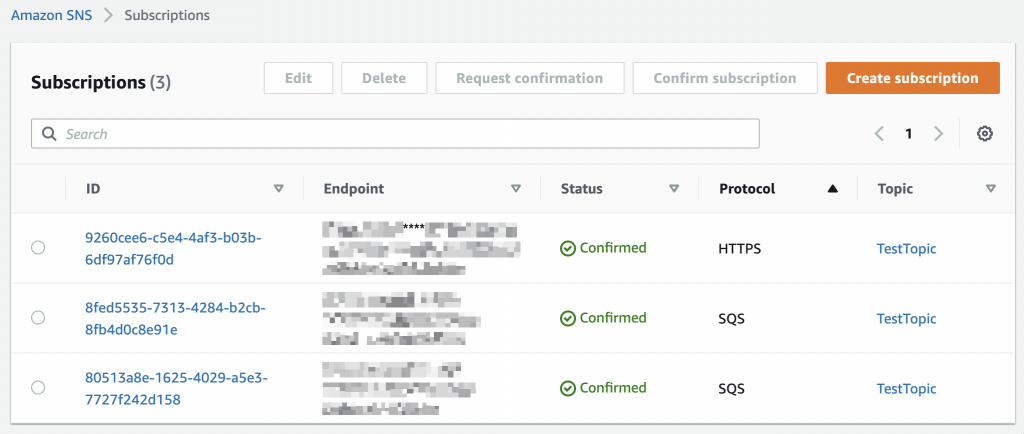
If for some reason, your subscription is still saying Pending Confirmation, you can select it and click on Request Confirmation to re-trigger the request. Once successful, it will show like Confirmed and you are ready to receive the notification messages.
Side note
You can also specify filters for the events ( if the publisher supports it ). For eg: Let’s say the publisher is posting all the events related to an order to test-topic . They have the option to set message attributes ( key-value pairs ) and one such key could be event_type that identifies the type of payload. In such cases, you can enable add a subscription filter by specifying the filter in the below JSON form
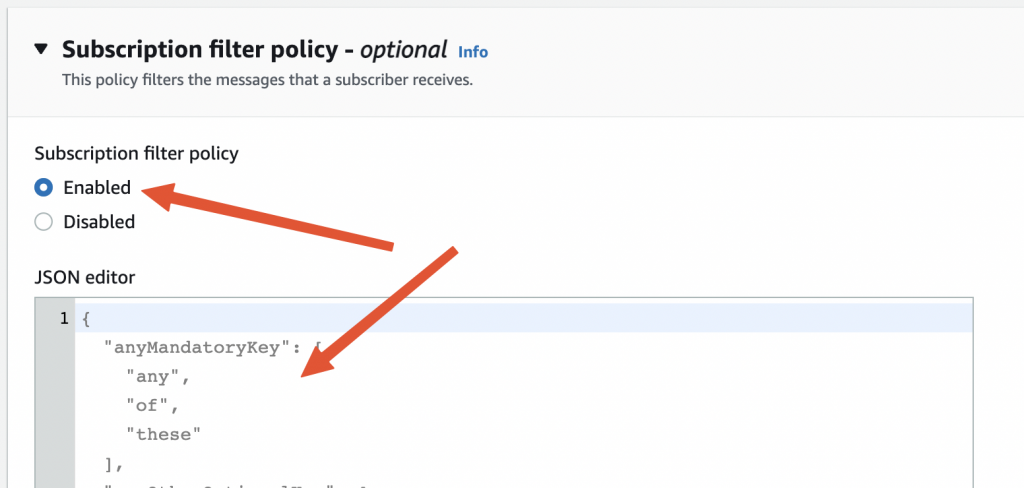
{
  "event_type": [
    "order-confirmed"
  ]
}
Testing the subscription
Now that you have set up the subscription setup and the service running. Let’s post some test messages and see if we are receiving the same.
Head to Topic -> Choose ‘Publish Message’ and provide the details
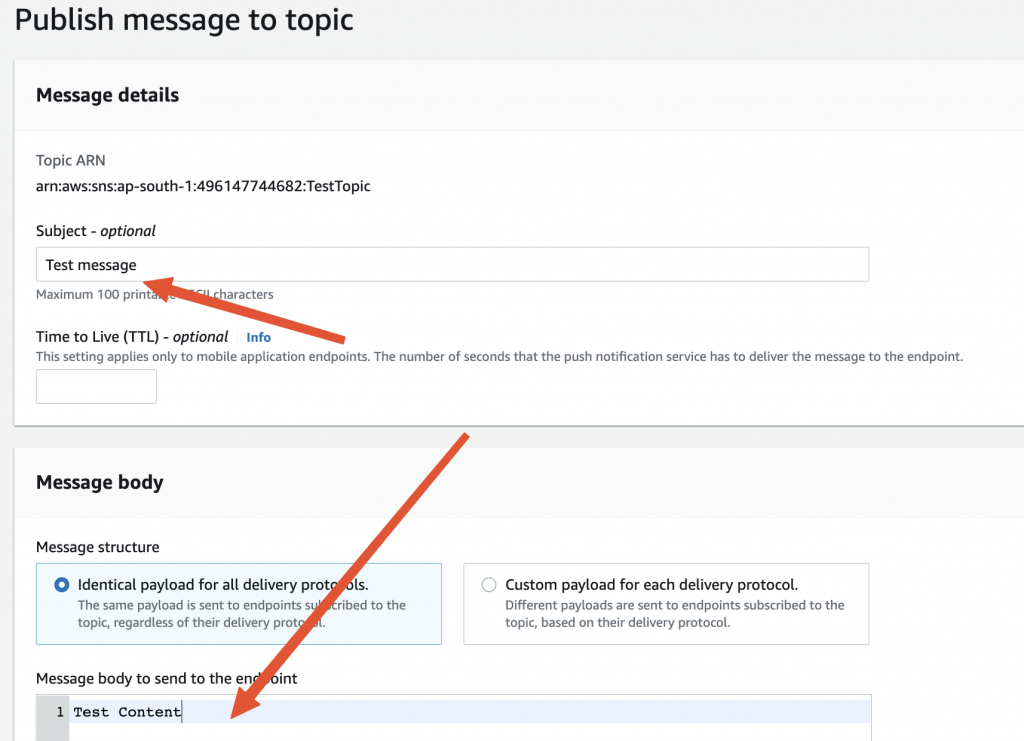
Note: If you have set any attribute filter in the subscription policy, you need to specify the same attribute while publishing a message.
Click on Publish and if the setup is all done correctly, you should receive the same message and subject in your applications logs.

Currently, only the String messages are supported by the SNS HTTP delivery. You could send the payload as JSON text which can be parsed at the receiver end to the required object.
Troubleshooting
HTTP link not confirmed
This will happen if the endpoint is not exposed or is not accessible over the public internet. Make sure that you are able to access the same over the internet.
Messages not delivering
- Ensure that there are no filtering policies applied during the subscription.
- If filtering policies are applied, make sure to pass the same at the time of publishing.
- Confirm that the role is defined properly with the right ARN
Next steps
We have achieved a basic setup for subscribing to the topics from SNS and the setup is quite simple and straightforward. But there are still some more things that we need to do for making it prod-ready.
Securing endpoints
We have exposed the endpoint for subscription and event delivery over the internet. It’s not secure and fortunately, SNS HTTPS allows for Basic and Digest authentication schemes. You can add a security configuration to secure the endpoints using Basic and when adding the endpoint, we could specify it in the below format.
There is also an option to whitelist the AWS IP ranges on your firewall, but that is difficult as the AWS ranges could be quite large and ever-updating.
SNS to SQS integration
Though the HTTP integration is simple, there will be scalability issues for the application when SNS is publishing events at a high velocity. In such a scenario, it would be better to have SNS publish to SQS and the application listen to SQS ( using long polling ). Here, the throttling and scaling will be handled by SQS and the application can process the messages based on their capacity and priority.
You can read about the SNS -> SQS -> Spring cloud integration in the next blog post.


Please paste the github link for entire source-code. Thank you in advance.
I am asking this be because I am getting below java exception in notificationStatus.confirmSubscription().
com.amazonaws.services.sns.model.InvalidParameterException: Invalid parameter: TopicArn (Service: AmazonSNS; Status Code: 400; Error Code: InvalidParameter;
If you are trying to call the endpoint from Postman, you will get this error as it requires some headers that are passed by the AWS callback mechanism. You will need to deploy this to a public instance and provide the URL in the AWS SNS for confirming the subscription.