Spring boot application using Hazelcast cache
Most of the modern application requires throttling for fast response time. The most common method used is to cache the data that is frequently accessed. A caching layer provides this functionality. When we want the application to scale, we need to have a distributed caching provider. Hazelcast is one such solution and in this post, we are going to build a simple Spring boot application which uses Hazelcast caching.
The objective
We are going to build a spring boot service with following functionality
- A simple spring boot application to store and retrieve customer details
- Data will be persisted to in-memory database ( H2 )
- Configure Hazelcast client in the application
- Connect to Hazelcast cache instance from application
- Implement @Cacheable on the service methods for data retrieval
- Implement @CacheEvict when an object is updated
Building the application
The entire application code is made available in the below GitHub account:
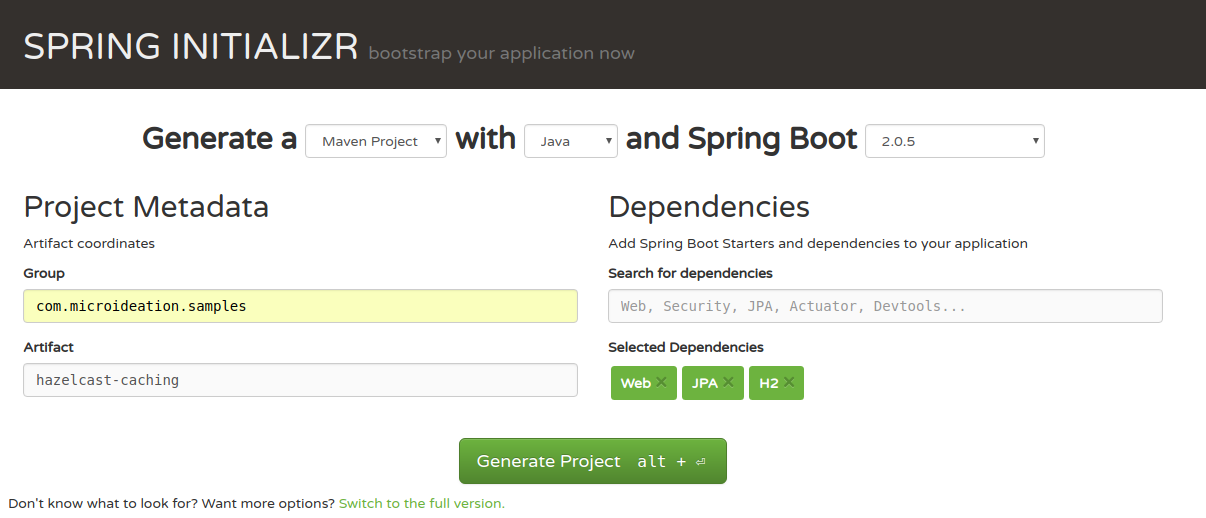
Generate a spring boot application
As the first step, we need to create a spring boot application. We will head to start.spring.io and create a spring boot application with Web, JPA and H2 as the dependency.
Open the pom.xml file and add the following dependencies to it
<dependency>
    <groupId>org.projectlombok</groupId>
    <artifactId>lombok</artifactId>
    <version>LATEST</version>
    <scope>provided</scope>
</dependency>
<dependency>
    <groupId>com.hazelcast</groupId>
    <artifactId>hazelcast-spring</artifactId>
    <version>${hazelcast.version}</version>
</dependency>
<dependency>
    <groupId>com.hazelcast</groupId>
    <artifactId>hazelcast-client</artifactId>
    <version>${hazelcast.version}</version>
</dependency>
We have added following dependencies
- lombok : This is used to reduce the boilerplate code ( getters, setters toString etc ). You can read more about the Lombok here.
- hazelcast-spring : Spring related dependencies for Hazelcast
- hazelcast-client : The core library handling the connection and caching with Hazelcast cluster.
MICROIDEATION APP: Programming and tech topics explained as quick learning cards ( ideations ) .
We have launched our new mobile app for learning programming and other tech-based topics in under 30 seconds. The content is crafted by subject-matter-experts on the field and each topic is explained in 500 or fewer characters with examples and sample code. You can swipe for the next content or freeze and follow a particular topic. Each content is self-contained and complete with links to related ideations. You can get it free ( no registration required ) in the play store now. ![]()
Create the application.yml file
The spring boot project by default will have application.properties under the resources folder. I am not a big fan of the properties file. So the first thing I do is to remove the application.properties file and add the application.yml file. Add the following content to the yml file. You need to replace the IP for the Hazelcast instance.
spring:
  profiles:
    active: dev
---
spring:
  profiles: dev
  application:
    name: hazelcast-sample
  datasource:
    url: jdbc:h2:mem:sample-database;DB_CLOSE_DELAY=-1;DB_CLOSE_ON_EXIT=FALSE
    platform: h2
    username: sa
    password:
    driverClassName: org.h2.Driver
  jpa:
    database-platform: org.hibernate.dialect.H2Dialect
    properties:
      hibernate:
        show_sql: true
        use_sql_comments: true
        format_sql: true
    generate-ddl: true
  h2:
    console:
      enabled: true
      path: /console
      settings:
        trace: false
        web-allow-others: false

cache:
  hostnames: 192.168.56.20:5701#
  username: dev
  password: dev-pass
In case you have changed the password in the hazelcast.xml file, you need to specify the same.
We have done the specified the following details in the yml file
- Specified a dev profile
- Added the configuration for the h2 database. The database name is “sample-database”
- Added the JPA configuration to display the sql commands being executed and generate_ddl for creating tables automatically from entity if not found.
- We have set the cache details under the cache entry.
- hostnames contain the IP:PORT for each node separated by #
- Username of the Hazelcast cluster ( configured in the hazelcast.xml file of Hazelcast node )
- Password for the cluster ( configured in the hazelcast.xml file of Hazelcast node )
Hazelcast instance setup
An active Hazelcast instance/cluster is required for running this application. We will not be covering the installation or setup part of Hazelcast. You can refer to the below posts for the same.
Create a CacheManager bean for Hazelcast
We need to provide a cache manager for Spring container. Spring cache implementation will use the HazelcastCacheManager for interacting with the hazelcast cache . For defining the cache, we will create a CacheConfig configuration class and provide the definition for the bean.
CacheConfig.java
import com.hazelcast.client.HazelcastClient;
import com.hazelcast.client.config.ClientConfig;
import com.hazelcast.core.HazelcastInstance;
import com.hazelcast.spring.cache.HazelcastCacheManager;
import org.springframework.beans.factory.annotation.Value;
import org.springframework.context.annotation.Bean;
import org.springframework.context.annotation.Configuration;

@Configuration
public class CacheConfig {

    @Value("${cache.hostnames}")
    private String hosts;

    @Value("${cache.username}")
    private String username;

    @Value("${cache.password}")
    private String password;

    /**
     * Method to create the hazelcastCacheManager using the settings
     * @return : Return the HazelcastCacheManager with the details
     */
    @Bean
    public HazelcastCacheManager hazelcastCacheManager() {

        // Create the cacheConfig
        ClientConfig config = new ClientConfig();

        // Set the username
        config.getGroupConfig().setName(username);

        // Set the password
        config.getGroupConfig().setPassword(password);

        // Split the address by #
        String addresses[] = hosts.split("#");

        // Set the addresses
        config.getNetworkConfig().addAddress(addresses);

        // Create the hazelcast instance
        HazelcastInstance instance = HazelcastClient.newHazelcastClient(config);

        // Return the hazelcastManager with the created instance
        return new HazelcastCacheManager(instance);

    }

}
We are doing the following things in the CacheConfig
- Annotate the class with @Configuration
- Load the cache configuration ( from the yml properties )
- Create the HazelcastCacheManager bean using the ClientConfig.
- Note that we are splitting the hostnames with # so that we can add multiple nodes if specified in the yml file.
Need to make sure that we use the proper ClientConfig and the HazelcastManager as there are multiple packages providing the same.
Define a Customer Entity
Let’s define a Customer entity with some basic fields. Make sure to annotate the class with @Entity.
Customer.java
import lombok.Getter;
import lombok.Setter;
import lombok.ToString;

import javax.persistence.Entity;
import javax.persistence.GeneratedValue;
import javax.persistence.GenerationType;
import javax.persistence.Id;
import java.io.Serializable;

@Entity
@Getter
@Setter
@ToString
public class Customer implements Serializable {

    @Id
    @GeneratedValue(strategy = GenerationType.IDENTITY)
    private Long id;

    private String name;

    private String mobile;

    private String email;
}
Please note the following
- The entity needs to implement the Serializable. If this is missed, Hazelcast may throw an exception during serialization.
- The getters, setters and toString are provided by Lombok plugin
Repository for the Customer entity
Let’s define a Customer repository interface extending the JPA repository. We will provide some JPA find by methods which will be further used in the service methods with caching.
CustomerRepository.java
public interface CustomerRepository extends JpaRepository<Customer,Long> {

    Customer findByMobile(String mobile);
    Customer findByEmail(String email);

}
Service class with caching implementation
Though you can implement caching on the repository methods, the suggested implementation is on the service methods. This will make sure that not just the data, but the logic behind each data is also cached. Let’s define the CustomerService interface as below:
CustomerService.java
public interface CustomerService {
    Customer saveCustomer(Customer customer);

    Customer updateCustomerEmail(Long id, String oldEmail, String newEmail);

    Customer findByMobile(String mobile);

    Customer findByEmail(String email);
}
Let’s have the implementation class defined as below:
CustomerServiceImpl.java
@Service
@Slf4j
public class CustomerServiceImpl implements CustomerService {

    private final CustomerRepository customerRepository;

    public CustomerServiceImpl(CustomerRepository customerRepository) {
        this.customerRepository = customerRepository;
    }

    @Override
    public Customer saveCustomer(Customer customer) {

        return customerRepository.save(customer);

    }

    @Override
    @Caching(evict = {
            @CacheEvict(value = "customer", key = "#oldEmail"),
            @CacheEvict(value = "customer", key = "#result.mobile")
    })
    public Customer updateCustomerEmail(Long id, String oldEmail, String newEmail) {

        Optional<Customer> customerOpt = customerRepository.findById(id);
        Customer customer = customerOpt.get();
        customer.setEmail(newEmail);
        return customerRepository.save(customer);

    }

    @Override
    @Cacheable(value = "customer", unless = "#result == null")
    public Customer findByMobile(String mobile) {

        log.info("findByMobile -> Inside service class : " + mobile);
        return customerRepository.findByMobile(mobile);

    }

    @Override
    @Cacheable(value = "customer", unless = "#result == null")
    public Customer findByEmail(String email) {

        log.info("findByEmail -> Inside service class : " + email);
        return customerRepository.findByEmail(email);

    }
}
As you can see in the service class, we are using the spring cache annotations ( @Caching, @CacheEvict, @Cacheable). We will see them in detail below.
@Cacheable
The @Cacheable annotation is used on the service methods where we want to cache the result ( return data ) of the method to a cache. You can specify a cache name and a key if required. If no key is specified, the passed parameters are used as the key. In the above class, @Cacheable is used on findByMobile and findByEmail methods. Following are the points to be noted:
- The @Cachable caches the result with the key as the params passed to the method unless a key is specified explicitly.
- The name of the cache is specified in the value attribute.
- For the findByEmail, the email param is the key.
- For the findByMobile, the mobile param is the key.
- The “unless” attribute is used to provide a SPeL condition. Here #result refers to the return object. We are specifying that we only need to store the result in the cache if the return object is not null.
Now whenever we call the findByEmail or findByMobile method, after the first time, the returned Customer object will be cached in the “customer” cache with email or mobile as the key respectively. All the subsequent calls will be responded from the cache if the key is present.
@CacheEvict
@CacheEvict is used when we want to evict the cache entry. This is required when we update an object referenced by a cache. In the above service, we need to evict the cache when the customer email is updated. You can specify the cache name and key for the entry to be evicted in the @CacheEvict annotation. In the above service, we have two @CacheEvict annotations over the updateCustomerEmail method. This is due to the configuration of customer cache by email and by mobile on the findByEmail and findByMobile methods respectively.
- For the first @CacheEvict, we define the key as #oldEmail. The key field uses SPeL statements and you can define the params using #param-name. So for referring oldEmail param, we can use #oldEmail as the SPeL statement.
- For the second @CacheEvict, we need to evict using the mobile of the customer object. Here the mobile is not passed as param, but we can use the mobile from the returned object of the method. As in the case of @Cacheable, we could refer to the returned object using #result and the field mobile as #result.mobile.
@Caching
The @Caching annotation is used when we want to combine multiple cache operations of the same type. In the above Service, we need to evict the cache for key email and mobile. Hence we used the @Caching for combining multiple @CacheEvict annotations.
Please note that you cannot use the #result in key for @Cacheable as the return data is what is cached and will not be considered for key for storing.
Controller class for invoking service methods
Now that the service class is done, we will define some REST endpoints that we can use to invoke the service methods. There is not much logic in the controller as they are only used to check the functionality of the service methods and the cache operations.
CustomerController.java
@RestController
@Slf4j
public class CustomerController {

    private final CustomerService customerService;

    public CustomerController(CustomerService customerService) {
        this.customerService = customerService;
    }

    @PostMapping(value = "/api/customers", consumes = MediaType.APPLICATION_JSON_VALUE)
    public Customer saveCustomer(@RequestBody Customer customer) {

        log.info("saveCustomer -> Request received: " + customer);
        Customer saved = customerService.saveCustomer(customer);
        log.info("savedCustomer -> " + saved);
        return saved;

    }

    @PostMapping(value = "/api/customers/email")
    public Customer updateEmail(@RequestParam(value = "id") Long id,
                                @RequestParam(value = "oldEmail") String oldEmail,
                                @RequestParam(value = "newEmail") String newEmail) {

        log.info("updateEmail -> Request received: Id - " + id + " : Old Email -" + oldEmail + " New Email - " + newEmail);
        Customer saved = customerService.updateCustomerEmail(id, oldEmail,newEmail);
        log.info("savedCustomer -> " + saved);
        return saved;

    }

    @GetMapping("/api/customers/search/email")
    public Customer getCustomerByEmail(@RequestParam(value = "email") String email) {

        log.info("getCustomerByEmail -> Email : " + email);
        Customer customer = customerService.findByEmail(email);
        log.info("getCustomerByEmail -> Found customer : " + customer);
        return customer;

    }

    @GetMapping("/api/customers/search/mobile")
    public Customer getCustomerByMobile(@RequestParam(value = "mobile") String mobile) {

        log.info("getCustomerByMobile -> Mobile : " + mobile);
        Customer customer = customerService.findByMobile(mobile);
        log.info("getCustomerByMobile -> Found customer : " + customer);
        return customer;

    }

}
There are 4 API endpoints defined in the controller
- POST /api/customers – For registering a new customer
- POST /api/customers/email – Updates the customer oldEmail to new one.
- GET /api/customers/search/email – Retrieves a customer by email
- GET /api/customers/search/mobile – Retrieves a customer by mobile
The final configuration
Before we could run the application, we need to make a final change to enable the caching in the application. For doing that, open the main application class. In my case, it is HazelcastCachingApplication.java and annotate the class with @EnableCaching.
HazelcastCachingApplication.java
@EnableCaching
@SpringBootApplication
public class HazelcastCachingApplication {

  public static void main(String[] args) {
    SpringApplication.run(HazelcastCachingApplication.class, args);
  }
}
Testing the application
Now that we have everything in place, let’s run the application and hit our APIs to verify that the caching is working as expected. When you run the application, you will see the logs for creating the customer table and Hazelcast connection. Now once it’s fully up and running, let’s start by creating a customer.
Create customer
Create a customer by calling POST on the http://localhost:8080/api/customers endpoint with the following JSON
{
  "mobile":"222333444001",
  "email":"test@sample.com",
  "name":"Microideation"
}
We will see the following logs in the application
2018-10-09 22:04:57.834  INFO 12913 --- [nio-8080-exec-2] c.m.s.h.controller.CustomerController    : saveCustomer -> Request received: Customer(id=null, name=Microideation, mobile=222333444001, email=test@sample.com)
Hibernate:
    /* insert com.microideation.samples.hazelcastcaching.domain.Customer
        */ insert
        into
            customer
            (id, email, mobile, name)
        values
            (null, ?, ?, ?)
2018-10-09 22:04:57.900  INFO 12913 --- [nio-8080-exec-2] c.m.s.h.controller.CustomerController    : savedCustomer -> Customer(id=1, name=Microideation, mobile=222333444001, email=test@sample.com)
As you can see in the logs, the request is received and you can see the SQL for inserting the logs. You will receive the response with id as 1
Find by Mobile
Let’s find the customer by calling GET as http://localhost:8080/api/customers/search/mobile?mobile=222333444001
We will see the following logs in the application.
2018-10-09 22:10:02.218  INFO 16663 --- [nio-8080-exec-3] c.m.s.h.controller.CustomerController    : getCustomerByMobile -> Mobile : 222333444001
2018-10-09 22:10:02.365  INFO 16663 --- [nio-8080-exec-3] c.m.s.h.s.impl.CustomerServiceImpl       : findByMobile -> Inside service class : 222333444001
2018-10-09 22:10:02.383  INFO 16663 --- [nio-8080-exec-3] o.h.h.i.QueryTranslatorFactoryInitiator  : HHH000397: Using ASTQueryTranslatorFactory
Hibernate:
    /* select
        generatedAlias0
    from
        Customer as generatedAlias0
    where
        generatedAlias0.mobile=:param0 */ select
            customer0_.id as id1_0_,
            customer0_.email as email2_0_,
            customer0_.mobile as mobile3_0_,
            customer0_.name as name4_0_
        from
            customer customer0_
        where
            customer0_.mobile=?
2018-10-09 22:10:02.648  INFO 16663 --- [nio-8080-exec-3] c.m.s.h.controller.CustomerController    : getCustomerByMobile -> Found customer : Customer(id=1, name=Microideation, mobile=222333444001, email=test@sample.com)
Here we can see the select statement for getting the customer for the mobile from the database. Let’s try calling the request again:
2018-10-09 22:11:36.112  INFO 16663 --- [nio-8080-exec-6] c.m.s.h.controller.CustomerController    : getCustomerByMobile -> Mobile : 222333444001
2018-10-09 22:11:36.119  INFO 16663 --- [nio-8080-exec-6] c.m.s.h.controller.CustomerController    : getCustomerByMobile -> Found customer : Customer(id=1, name=Microideation, mobile=222333444001, email=test@sample.com)
Now you can see that there are no logs for the service method execution. This is because the request is served from the cache. You may also notice that there is an improvement in the response time.
Find by Email
This would be the same as findByMobile logs. The first request will result in a call to the database and the subsequent calls will be served from the cache.
Update Email ( Cache Evict )
At this point, we have got both the email and mobile for the customer with id =1 in the cache. Now we are going to update the customer email and will check the cache evict operation. Let’s hit the API http://localhost:8080/api/customers/email with following POST params.
- oldEmail=test@sample.com
- newEmail=test2@sample.com
- id=1
2018-10-09 22:15:47.844  INFO 16663 --- [nio-8080-exec-9] c.m.s.h.controller.CustomerController    : updateEmail -> Request received: Id - 1 : Old Email -test@sample.com New Email - test2@sample.com
Hibernate:
    select
        customer0_.id as id1_0_0_,
        customer0_.email as email2_0_0_,
        customer0_.mobile as mobile3_0_0_,
        customer0_.name as name4_0_0_
    from
        customer customer0_
    where
        customer0_.id=?
Hibernate:
    /* update
        com.microideation.samples.hazelcastcaching.domain.Customer */ update
            customer
        set
            email=?,
            mobile=?,
            name=?
        where
            id=?
2018-10-09 22:15:47.887  INFO 16663 --- [nio-8080-exec-9] c.m.s.h.controller.CustomerController    : savedCustomer -> Customer(id=1, name=Microideation, mobile=222333444001, email=test2@sample.com)
This will give the above log indicating the update SQL.
Now let’s hit the API to find the entry by mobile
2018-10-09 22:16:58.436  INFO 16663 --- [nio-8080-exec-2] c.m.s.h.controller.CustomerController    : getCustomerByMobile -> Mobile : 222333444001
2018-10-09 22:16:58.438  INFO 16663 --- [nio-8080-exec-2] c.m.s.h.s.impl.CustomerServiceImpl       : findByMobile -> Inside service class : 222333444001
Hibernate:
    /* select
        generatedAlias0
    from
        Customer as generatedAlias0
    where
        generatedAlias0.mobile=:param0 */ select
            customer0_.id as id1_0_,
            customer0_.email as email2_0_,
            customer0_.mobile as mobile3_0_,
            customer0_.name as name4_0_
        from
            customer customer0_
        where
            customer0_.mobile=?
2018-10-09 22:16:58.441  INFO 16663 --- [nio-8080-exec-2] c.m.s.h.controller.CustomerController    : getCustomerByMobile -> Found customer : Customer(id=1, name=Microideation, mobile=222333444001, email=test2@sample.com)
As you can see, this resulted in a select call to the database and we received the customer object with latest email details. This confirms that the cache was evicted for the entry with given mobile. Subsequent calls will be served from the cache.
You can verify the same with findByEmail. You will be able to observe similar behaviour there as well.
Conclusion
I confess that its a bit lengthy post. But this does cover the most important aspects for setting up a Hazelcast cache for your spring boot application. You can download the Github for the sample application and go through the code in detail.
Let me know your queries in the comments section below.
regards
Microideation