Customizing Ubuntu system
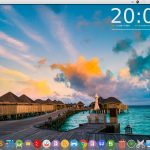
I have been using ubuntu for the past 5 years and have done a lot of customization which helped me in organizing and optimizing the desktop and system for the time I spent on it. And this is how it looks now.


Recently I had written an answer in quora regarding the customization done by programmers to their system and received a lot of requests to share how I did my setup. So in this post , I am going give a step by step guide on how to customize the ubuntu desktop.
Kindly note that the steps below are based on the customization I have done based on my preferences and may not be suited for your use case. Nevertheless, these customization has proved to be worthy of my time and is helping me a lot as programmer on my day to day work.
The system
I am currently using a Thinkpad T420 , Core i5 2.5 Ghz , 16GB ram and 120 GB SSD drive. You can read the post of how to upgrade your Thinkpad here.
- Thinkpad T420
- Ubuntu 14.04 LTS
- 1600 x 900 px resolution
Most of the customization links / installation commands are based on the Ubuntu 14.04 , you may find the alternate repository for other versions.
Ubuntu Customization
So , lets start with the customization. We are going to customize / install following components of ubuntu
- Disabling of unity launcher
- Installing docky ( Dock )
- Installing synapse
- Configuring conky
- Installing icons
- Configuring font
- Terminal
- Theme
- The wallpaper
- Other softwares
We will see each in details below:
Disabling unity launcher
I don’t have anything against the unity dash. It has improved a lot from the day it was first launched. But I still feel that the dash is missing so important actions and aesthetics that is required for the desktop. This may be due to the fact that I am also a fan of Mac look and feel 🙂
So first things first, lets disable the unity launcher. But its not easy as it sounds. There is no option to disable the launcher completely !!!. I mean, there is not switch that you flip to remove the launcher. We need to do a hack for doing this. This will only prevent the launcher from showing up in the desktop.
- Right click on the desktop and click on “Change desktop background”
- It will open up the following dialog and select the tab “Behaviour”

- We need to make sure that the reveal location is “Top left corner
- Set the reveal sensitivity to “Low”
- Also set the “Auto hide the laucher” to true
This will prevent the launcher from showing up in the desktop again.
Installing docky ( Dock )
Since there is no launcher , we need to immediately have a replacement. The best dock money can buy is obviously “Docky” 🙂
$ sudo add-apt-repository ppa:ricotz/docky
$ sudo apt-get update
$ sudo apt-get install docky
You can run docky and it will appear at the bottom of the screen by default. Clicking on the dock icon ( The first icon in the dock and customize the dock )

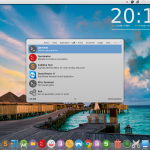
Installing synapse
Since the launcher is not visible, we need an alternate arrangement to find and launch the applications.
We have a super fast application launcher called synapse. Get a terminal window and fire up the following commands:
sudo add-apt-repository ppa:synapse-core/ppa
sudo apt-get update
sudo apt-get install synapse

You can configure synapse by clicking on the top right button of synapse which opens the Settings screen. I have configured the <Super> Space as the trigger, you may set what best suits you.
Clicking the activate button will bring up synapse and you can start typing the first letters and your files and applications will be magically presented without any delay.

Configuring conky
One of the major elements that provide the unique look in the desktop is the conky tool. Conky is basically a customizable monitoring system that can draw over the desktop without affecting the windows.
For using conky , you need to install the conky tool first
sudo apt-get install conky
You can run conky by typing just “conky” on the terminal. Conky needs a configuration file to show the elements in the desktop. If conky is run without any parameters, then configuration is taken from ~/.conkyrc file. This is the file in your home directory.
For my system, I have used a custom conky theme called Infinity conky and did some customizations of my own.
Details of the infinity conky theme can be seen here
You can find the file I am using in my github repository
https://github.com/sandheepgr/ubuntu-customization/tree/master/ubuntu-customization/unity/conky
You will find .conky file and .conkyrc file. You need to put both under the home folder. Please note that the files and folders starting with . (dot) are hidden by default in the ubuntu file explorer. You will need to press Ctrl + H to show these files.
Once the files are copied, you can kill conky and start again and it will display the conky configuration elements in your desktop. The .conkyrc file is optimized for the resolution of 1600 x 900 ( my display ) . You may play around with the offset values in conkyrc file to match your setup.
Installing icons
Icons plan an important role in the look and feel of the system. I am currently using the numix circle icon set and has found it to really go well with the dock.
sudo apt-add-repository ppa:numix/ppa
sudo apt-get update
sudo apt-get install numix-icon-theme numix-icon-theme-circle
You can find more details about the icons in the noobslab link.
Once you install the icons, you need to select the icon theme. This is done using an inevitable tool called “Ubuntu Tweak”. Install it using the following commands
sudo add-apt-repository ppa:tualatrix/ppa
sudo apt-get update
sudo apt-get install ubuntu-tweak
Open the application and you will see the following below:

Click on the “Tweaks” tab and then on the “Theme” button. Here you can select the icon theme for the system.

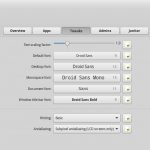
Configuring font
The default font shipped with ubuntu is fair enough. But I like the Droid sans better and have changed the system font to reflect that.
You can download the font from here and extract the content to ~/.local/share/fonts
After installing the fonts, you can have them set from the Ubuntu Tweak tool by going to the fonts section

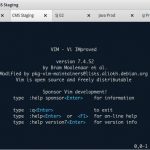
Terminal
I have setup my terminal to mimic the Mac style We need to configure the custom font and the styles for the terminal.
Download the style xml file from the following location
https://github.com/sandheepgr/ubuntu-customization/blob/master/ubuntu-customization/unity/terminal/terminal-color-scheme.xml
Run gconftool-2 –load terminal-color-scheme.xml
Goto Terminal -> profile preferences -> Change font to Monaco ( size = 10 )
Reference:
http://askubuntu.com/questions/384551/mac-os-x-terminal-clone-for-ubuntu

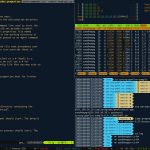
Oh my zsh !!!
I am using oh-my-zsh and tmux ( terminal multiplexer ). You can find my dot files in the following links. I was using bash for all time and just tried out zsh. It was really superb and provided a lot of functionality out of the box. The auto completion while using the directory traversal and ability to select from the list using double tabs is awesome. Also , there are plenty of plugins that you can use to make your day to day work on the terminal much easier.
Tmux
On top of ZSH , I am using tmux as terminal multiplexer. I was using terminator before and it used to provided decent funtionality for splitting panes and tabs. But the traversal and customizations were limited. Tmux provided a whole new level of customization capabilities and the ability to store my session ( the windows and panes that I was working on).
VIM
I mostly work on Spring and Android and have little use of VIM as a IDE. IntelliJ and Android ADT provides very decent support for the respective platforms. But I have started using VIM for every else ( let it be a simple php/bash script or traversing a log file ). Did some customizations and added some plugins to make things easy.
You can find the dot files for tmux and zsh in the below links.
tmux
zsh
vim
Tilda
I am using Tilda as a dropdown terminal for my system. The advantage of having a dropdown terminal is that you can always pull it down from any screen ( In my case, I am using 8 virtual desktops and has configured F10 to be the trigger for tilda) and execute the commands then and there.
$ sudo apt-get install tilda

Theme ( MBuntu )
I am using a Mac for ubuntu transformation pack ( Mbuntu-Y-For-Unity ). You can install it from the following commands
$ sudo add-apt-repository ppa:noobslab/themes
$ sudo apt-get update
$ sudo apt-get install mbuntu-y-ithemes-v4
After the theme is installed, you can run ubuntu tweak and go to Theme selection dropdown for selecting the Mbuntu theme.
The Wallpaper
The link to the wallpaper I am using can be found below:
https://github.com/sandheepgr/ubuntu-customization/tree/master/ubuntu-customization/unity/wallpaper
Please note that this is downloaded from a hd wallpaper site and will need abide by the terms and conditions specified by the owner.
Other softwares
I am using several other tools for my day-to-day work and would like to list some of them here for your reference:
- Nemo file manager ( Supports splitting by pressing F3)
- Filezilla for FTP client connections
- Remmina for managing RDP connections
- F.lux for controlling screen temperature
- Shutter ( Excellent tool for screenshot capturing )
- Thunderbird as email client
- Sublime and gedit as text editors
- WPS Office for office tools ( Spreadsheet, presentation and writer )
- Google chrome as primary browser
This is my humble system setup and I hope that you will be interested in trying it out. Let me know if you are facing any issues with the setup or require any further assistance with any of the tools specified above.
All the best and happy customization 🙂 !!
regards
S


I just loved what I saw on your desktop. From the wallpaper to the other stuff. Looks so futuristic. Haha. Always been a fan of GUI. Share wallpaper link maybe? Thanks.
I just loved what I saw on your desktop. From the wallpaper to the other stuff. Looks so futuristic. Haha. Always been a fan of GUI. Share wallpaper link maybe? Thanks.
Hi
I was trying to add conky and have run into some issues. Does conky not work with desktop icons at the same time ? could you tell which settings i need to change for a 1920×1080 display ?
PS: Fantastic post 😉 Though i use cairo-dock and redshift instead of docky and f.lux 🙂
Hi Vaibhav,
Conky will draw its components over your desktop and this will cause the icons to be hidden. One way to overcome this is by making conky align to either side and reduce the width of the conky window ( may be half of the screen ) and then the remaining part of screen can be used for your icons.
Regarding the values for the resolution, you will need to play around with the values in voffset and offset. You can save the conkyrc and it will be updated in realtime on the desktop when conky is running.
I am running gnome 3 and have some issues with conky like it doesnt directly prints on the desktop as in your system. Instead it creates its own window with the minimise, maximize and close option. Is it incompatible witn gnome or am i doing something wrong. Please help. Thanks
Hi sarthak,
Is it happening with the conkyrc file from my setup ?
Try the the own_window_* configuration values from my conkyrc setup
Yes, i guess thats it. And not only your file. Other themes from deviantArt don’t seem to work as well. Only the ones provided by default are running.
How did you get those colors of Close/Maximize/Minimize buttons?
It comes with the theme I am using ( MBuntu-Y-For-Unity
How did you get those colors of Close/Maximize/Minimize buttons?
It comes with the theme I am using ( MBuntu-Y-For-Unity
Hi Sandeep,
Please add the gtk theme,window theme isntallation (Mbuntu-Y-For-Unity)
That seems to be missing here,
#add-apt-repository ppa:noobslab/themes
#apt-get update
#apt-get install mbuntu-y-ithemes-v4
BTW thanks for all your efforts, This blog is really great
Thanks 🙂
Have updated the post to include the same.
Github link for conky says “Page not found”
Have fixed the link.
Thank you 🙂
Github link for conky says “Page not found”
Have fixed the link.
Thank you 🙂
The ubuntu-tweak just doesn’t get installed
The ubuntu-tweak just doesn’t get installed
Thank You but I am facing problem in deciding offset values.My screen resolution is 1366 X 768(16:9).I am also facing problem in installing Ubuntu Tweak.It says “Unable to locate package Ubuntu Tweak.”.I am following all the commands listed.Please help!!!
Please tell me what is the version of your ubuntu.
Ubuntu 16.04 LTS.For Ubuntu Tweak I have installed gnome tweak tool.
Hi, thanks a lot for this! Have you been able to install the missing fonts in WPS Office? It’s kinda useless to me without them.
Hi, thanks a lot for this! Have you been able to install the missing fonts in WPS Office? It’s kinda useless to me without them.
Hey, wonderful post! 🙂
The speed graphs are not shown to me by conky.
Can you help me in this?
Hey, wonderful post! 🙂
The speed graphs are not shown to me by conky.
Can you help me in this?
Hey, wonderful post! 🙂
I am not able to get the speed graphs in conky. Can you help in this?
Hey, wonderful post! 🙂
I am not able to get the speed graphs in conky. Can you help in this?
Hi,
I tried to install docky by following this tutorial, while installing after this command
$sudo apt-get install docky
I got the below error, I have tried to clean the apt-get cache and all. Nothing works, Still the persists. Could you please help on how to fix this?
Fetched 11.9 MB in 55s (214 kB/s)
E: Failed to fetch http://in.archive.ubuntu.com/ubuntu/pool/main/m/mono/libmono-system4.0-cil_3.2.8+dfsg-4ubuntu1.1_all.deb Hash Sum mismatch
E: Unable to fetch some archives, maybe run apt-get update or try with –fix-missing?
Thanks & Regards,
Hi,
It looks to be something to do with the repo you are using.
I would recommed posting this in askubuntu.com with relevant logs.
Hi,
Thank you for the awesome tutorial. I am a newbie to Linux distributions. I have installed Xubuntu yesterday. I was wondering if I could apply the same to Xubuntu. If yes, will it be possible for you you to help me?
You can do apply the same customizations. Only issue would be the missing unity panel at the top.
The tutorial would remain the same for the most part of it as Xubuntu is a variant of Ubuntu
I tried following the tutorial but I was not able to disable the launcher and neither was I able to install synapse.
Can you give the steps for both which would be applicable for Xubuntu
Nice job!!!
But where do I get the MUbuntu theme you are using?
You could do it from below link for 14.04
http://www.noobslab.com/2014/11/mbuntu-macbuntu-1410-transformation.html
Nice job!!!
But where do I get the MUbuntu theme you are using?
You could do it from below link for 14.04
http://www.noobslab.com/2014/11/mbuntu-macbuntu-1410-transformation.html